Have the documents ready
Yes, this article will help you to quickly connect your sensors to a Milesight router, but if in doubt, keep the manual ready to verify your steps when needed.
Also, this guide is going to use the Excel sheet that decodes uplink and downlink messages, the "Enless LoRaWAN Data Frames" sheet.
Both can be found on our support website HERE
Make sure the UG65 is running a recent version of firmware
The integration with the Enless Sensors and the success of sending downlinks down towards the end of this article is dependent on the UG65 gateway running at least firmware version 60.0.0.39. If your gateway is running an older version, please update downloading the firmware HERE.
Also, please make sure you LEAVE THE GATEWAY ON for the entire duration of the update, which could take several minutes. Rebooting or unplugging the gateway during the update might damage the gateway and make it unusable.
Prepare the sensor
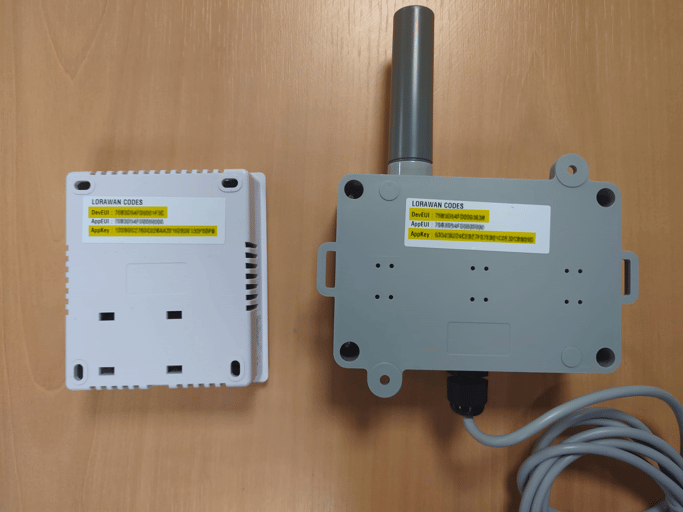
The sensors come with the battery disconnected, a label with the LoRa WAN details and a jumper inside to set the sensor to work with the Enless dedicated gateway or any generic LoRA WAN gateway.
Check the back of the sensor and take note of the LoRa WAN details. We are going to use the DevEUI and the AppKey in our article
Alternatively, use the QR code also attached to the sensor: scan it, and the details will be easily available on your mobile phone
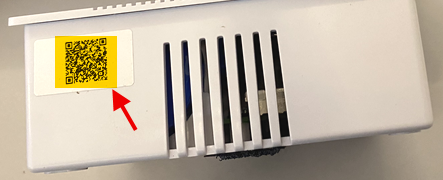
The information will be seen as follow:
Enless Wireless|Model|Manufacturing information|Manufacturing information|Serial number|Firmware version|DevEUI|AppEUI|AppKey
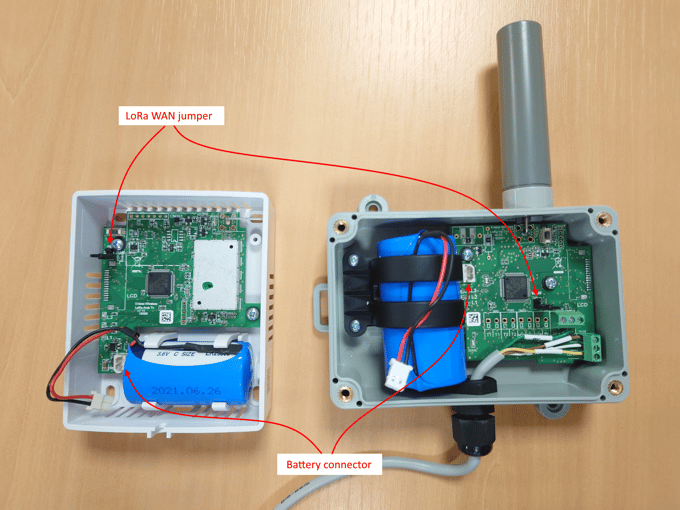
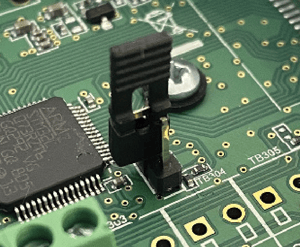
Then, open the sensor case, verify the battery is disconnected and make sure the jumper position is OPEN, so that the sensor will communicate using standard LoRa WAN
Jumper open position
Set the Milesight gateway
We are not going through the entire gateway setup and we will assume you have got the gateway ready and accessible with your browser. For more information on this, check the manual for the Milesight gateway (we are using the UG65).
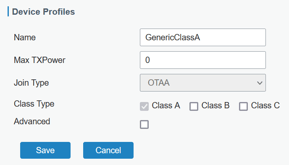
If you haven't got it already, create a device profile. Go to "Network Server" (1), then "Profiles" (2) and create a new profile (3)

Here is how your profile creation should look like
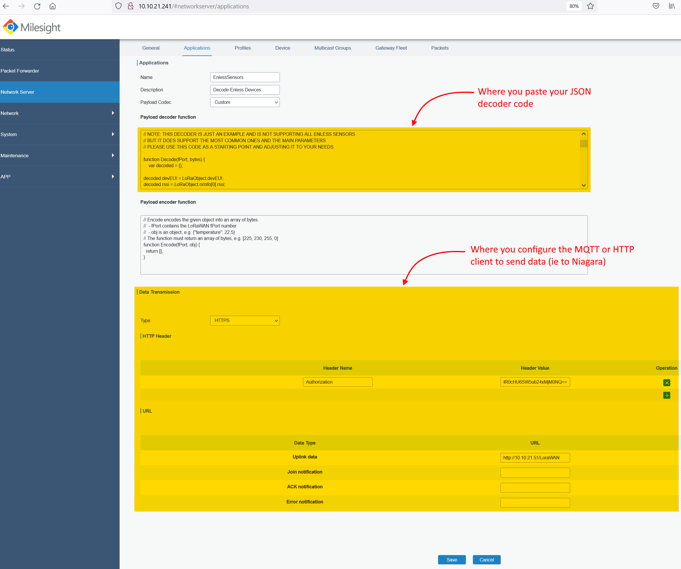
Also, you might want to create an "Application", so that you can
- Decode the uplink payloads from your sensor into JSON payloads
- Set up an MQTT and/or HTTP client to push data out
NOTE: Please check THIS ARTICLE where we show how we push data to Niagara using the Milesight local network and the Application.
What we want to do is go to "Network Server" (1), "Applications" (2) and then add our new application, which eventually will look like mine below
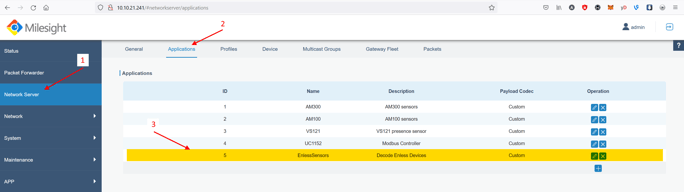
The application window should look like this
If you plan on using this, you will find some decoders on our support website, HERE
We created a general decoder for Enless sensors which works with the most common Enless Sensors and gives back on the JSON payload the main readings and the battery level.
Please use it as a starting point, you can edit it to your needs if required.
Here is a typical Application for my Enless sensor. Please refer to the article linked a few lines above to know how to get data to your Niagara station using the Application
Now with the Profile and Application ready, we can add our sensor.
Go to "Network Server" (1), "Device" (2) and press "Add"
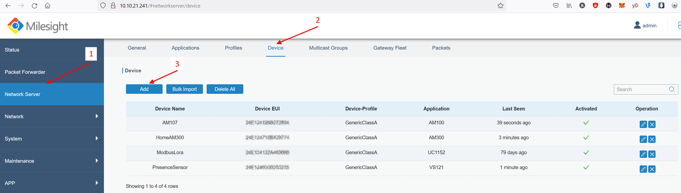
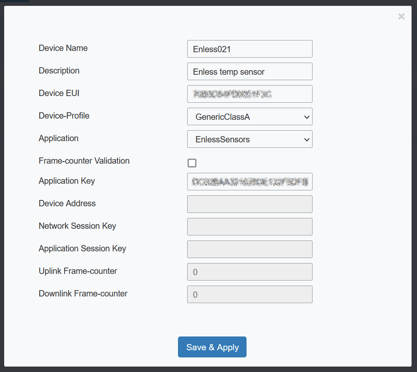
In the device setup, give your sensor a Name and Description, add the DevEUI and AppKey you noted from the label on the sensor and select the Profile and Application to use for this sensor
Back to the sensor
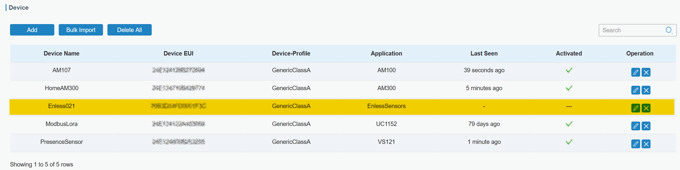
Your sensor will look like this when you just add it to the gateway
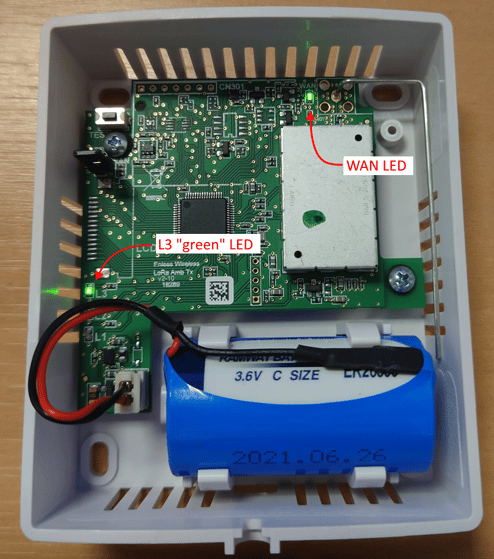
Back to the sensor, connect the battery to the battery connector inside the sensor.
When the pairing is successful, you will see 2 things.
First, the sensor will show both the WAN and the L3 green LEDs on for a few seconds
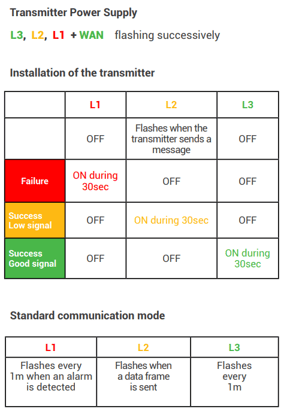
Here is also a more detailed view of the LEDs status, taken from the Enless Manual (available HERE)
Second, the "Device" section on your gateway will show the "last seen" time for your new sensor
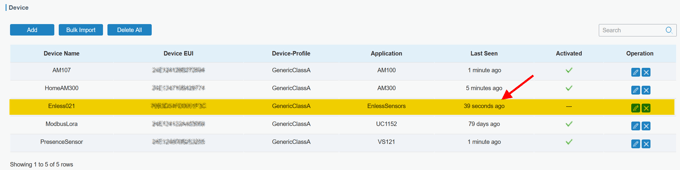
With this completed, the sensor is correctly connected and you are using it with its default settings.
Here is a list of the default transmission rates for each sensor:
| 600-021 | 5 min |
| 600-022 | 15 min |
| 600-023 | 15 min |
| 600-031 | 5 min |
| 600-032 | 5 min |
| 600-232 | 5 min |
| 600-034 | 5 min |
| 600-036 | 5 min |
| 600-037 | 5 min |
| 600-038 | 5 min |
| 600-039 | 5 min |
| 600-035 | 5 min |
If you need to change the sensor settings, keep reading this article.
Prepare the Downlink configuration message (optional to change from sensor default settings)
The Enless sensor can be configured using Downlink messages.
Open the Excel sheet "Enless LoRaWAN Data Frames" from our support website HERE.
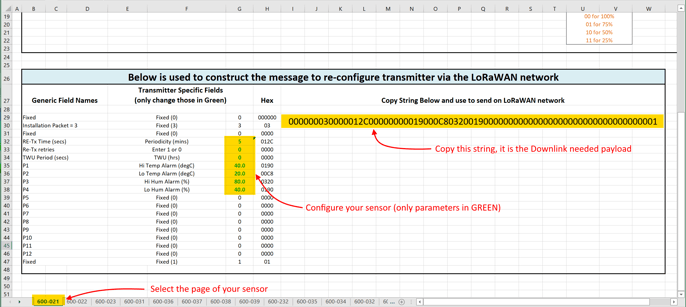
Locate the sensor you want to configure on the tabs below, based on the part number of your sensor (mine is a 600-021).
Check the second table in the page to create your message to configure the sensor.
Set the sensor parameters (they are the ones in GREEN).
Once finished, copy/note down the long string on the right hand side: that is going to be the payload needed to configure the sensor later.
Now we can send our configuration payload to the sensor using the UG65 gateway.
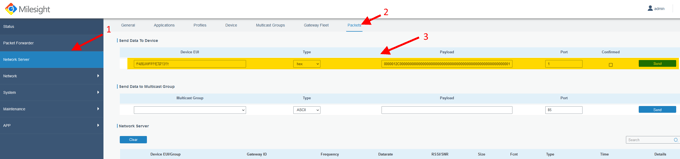
Go to "Network Server" (1), "Packets" (2). Locate the section "Send Data To Device" (3).
From there, insert the DevEUI of the sensor, select "hex" as type and paste the payload you got from the Enless LoRaWAN Data Frames Excel sheet (make sure there are no spaces and that the whole payload is there), select value "1" for the "Port", leave the flag "Confirmed" unticked and finally press "Send"
Note: the sensor will need to be "awake" for the downlink to eventually work. The UG65 will queue the transmission until this happens. The sensor will be listening to a downlink message after each transmission. So you can either wait for the next transmission within 5 minutes, or press the button within the sensor to force a transmission.