GCP IoT Core and MQTT - Quick Overview and Clarification
If you just want to get started, please scroll down to the next section, but it might help to explain a little about GCP IoT Core's use of MQTT as it doesn't really follow the traditional architecture of MQTT. Instead, it really only uses the protocol as a way of communicating with "Devices" in the field to consume data in GCP for different cloud applications or to command "Devices" in the field from GCP applications - it doesn't really operate as an MQTT broker in the true sense where one device publishes and another device can subscribe to the same topic with the broker in the middle provding the link.
So what does it do?
- It allows Niagara stations to push data or "telemetry" and device state to GCP by publishing to the following specific topics -
- /devices/DEVICE-ID/events - this is for data/telemetry, e.g. temperatures, kWh etc.
- /devices/DEVICE-ID/state - this is for device status monitoring in GCP, OK, Down etc.
- It allows Niagara stations to receive data from GCP in order to receive commands, e.g. setpoint changes, resets, enable commands etc. by subscribing to the following topic -
- /devices/DEVICE-ID/commands/#
GCP IoT Core uses its own "internal" Pub/Sub topics that perform different functions from the MQTT ones used to collect and distribute "Device" data - this can be confusing, so just be aware of the two different "realms" of topics that are used.
Hopefully that clarifies the basic principles and will help you to understand the following quick-start guides more easily.
Quick-start Guide - Publishing Data from Niagara to GCP
- Make sure you or your customer has a GCP account and has access rights to configure IoT Registries and Devices
- Log into your GCP Console and open burger menu top left, scroll down to "Big Data" section and select "IoT Core" option (Pin it for easy access while you are there too)

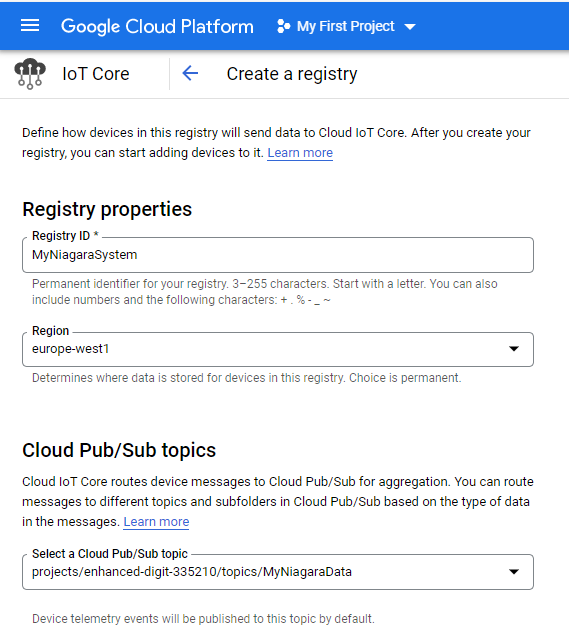
- Click "Create Registry" button at top then fill out details as required -
- Name the registry appropriately
- Set the region to your closest one, e.g. "europe-west1"
- Set an appropriate topic, e.g. MyNiagaraData - all telemetry messages from the Registry's Devices are aggregated to this topic, unless you start using subfolders - more on this later
- Click "Show advanced topics"
- You only need "MQTT" protocol (for this guide), uncheck HTTP
- Set "Cloud Logging" to debug - this will help later to check all is well with comms from N4 station
- You DO NOT need to configure "CA Certificate" but you may want to for added security (which is not covered in this guide)
- Click "Update" when you have something looking like below -
- Click on your new Registry in the main IoT Core menu

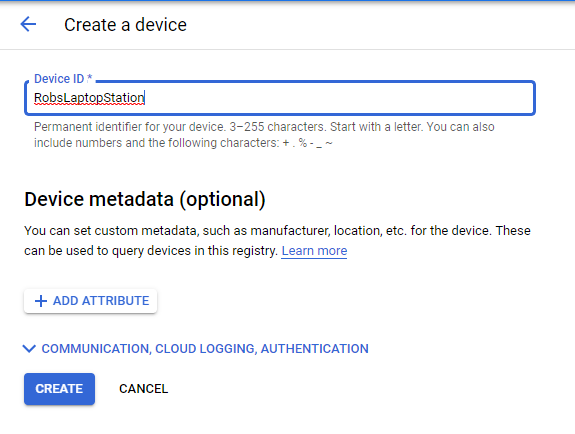
- Click on "Devices" in left side menu then click on "Create Device" button at top
- Name appropriately
- Click "Create" at bottom - we will come back here later to add the "Authentication" public key once created in N4 station
- In N4 Workbench, connect to your station and -
- Add the abstractMQTTDriverNetwork under Config\Drivers
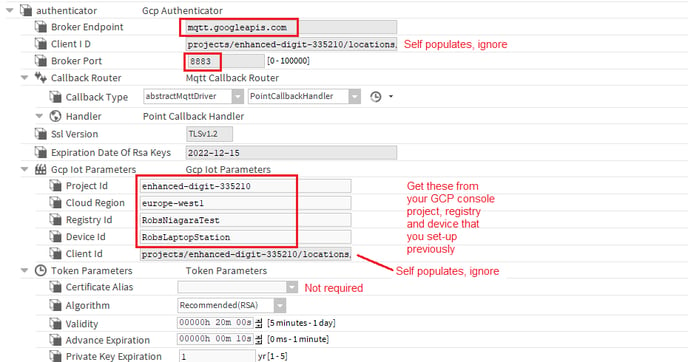
- Open the abstractMQTT palette and from "Devices" folder, drag a "GcpMqttDevice" to the above
- Set-up parameters as shown -
- When added, a public key file will be generated here -

- Copy this to a convenient location on your PC hard drive
- PLEASE NOTE - you can recreate this at a later date by un-hiding a hidden action slot under "Authentication" slot of your GCP device called "Generate Rsa Keys" then right-clicking on "Authentication" slot and selecting the action
- Back in GCP Console go back to the device under IoT Core, your new Registry, then click on the device you are currently working on -
- Click on "Authentication" tab
- Click on "Add public key" button
- Select "Upload" radio button then browse to where you saved the PEM file the GcpMqttDevice in N4 created then click "Add"
- Back in Workbench - right click your GcpMqttDevice and select action connect - check status goes to "OK" and Status Message says connected
- Add Points as required -
- The Topic needs to be in the format; /devices/your GCP device name here/events
- Please note - the text in the topic above NOT in bold is specifically what needs to be in the topic, it is not an example, this is how GCP is set up
- There is the option to add "subfolders" to additional topics in the GCP Registry set-up/edit view if you want certain messages to publish to topics other than the registry default, e.g. you could create an additional registry topic with a subfolder called "Alarms" and then add it to the end of the topic, i.e. -
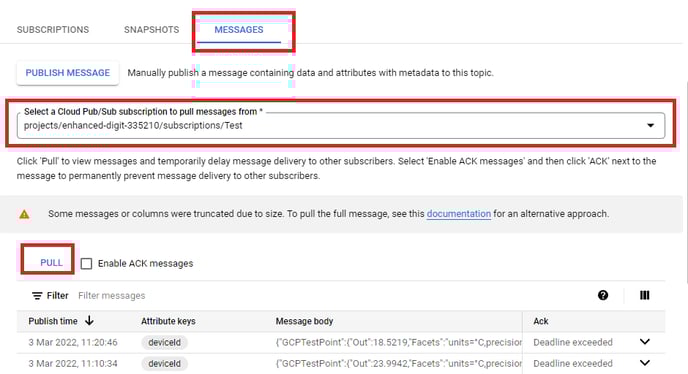
/devices/your GCP device name here/events/Alarms - Check the points are publishing by clicking on your Registry in IoT Core top menu to view details then click on topic (you set in step 3b) under "Pubs/Subs", scroll down and click on "Messages", then select Create Subscription (or select one from the drop-down box if already set up) to associate with your registry topic, name and accept default and press "Pull" button - you should see your publishes coming in
- The Topic needs to be in the format; /devices/your GCP device name here/events
Quick-start Guide - Receiving Data From GCP to Niagara
- Assuming all the above steps have been made (except specific to MQTT publish points), add an MqttStringSubscribePoint to the device's points folder -
- Name - your choice
- Set Topic to /devices/your GCP device name here/commands/#
- Right-click on device and select Actions/Subscribe All
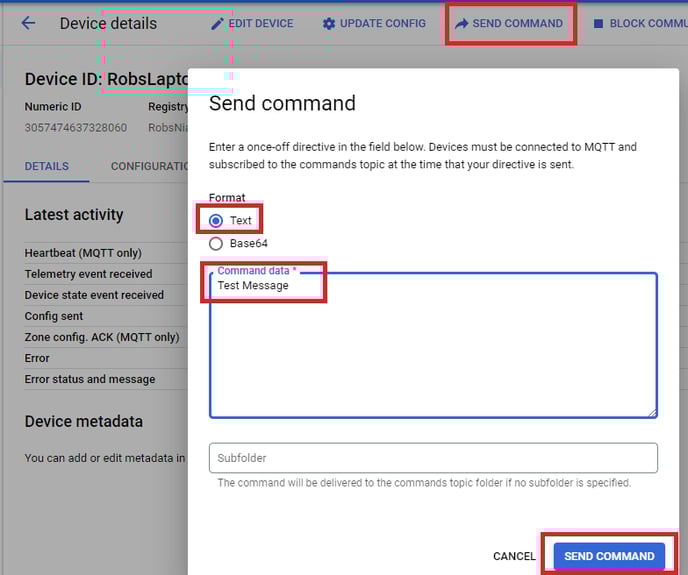
- Go to GCP Console IoT Core\Devices and select the device you're working on
- Select Send Command from top menu and set format to text, add test message then click Send Command
- You should see the message in the output of the subscribe point back in Workbench
- This is a simple way of checking the basic comms route is functioning - GCP can be configured to use commands in application coding to write to Niagara points for user interface or more sophisticated automation.