An introduction before we start
The Milesight UG65 gateway allows to connect different LoraWAN sensors and push data to the most common Lora IoT cloud services. Having said that, the UG65 integrates also a couple of extra things that we are going to use on this article:
- The payload decoder, which allows to translate the base64 raw data you get from your sensors into a JSON payload which you can easily read
- The embedded Network Server, which allows the UG65 to send the sensors decoded JSON payload to either an MQTT broker or to an HTTP server
With this article we are going to use the payload decoder and the HTTP embedded client to connect to a Tridium Jace and get data sent across. MQTT can also be used, but the need of a broker and the fact that neither the Jace nor the UG65 have an embedded broker available, means that you will need to connect to either a cloud broker or install a broker locally, hence why the use of the HTTP API instead.
The Jace we are going to connect to is using IP address 10.10.21.51 and is running Niagara 4.11, while the Milesight UG65 is using IP address 10.10.21.241
Most parts included in this article will apply also in case you decide to use MQTT.
Do not get scared by the long guide, it is actually much easier than it seems.
Enjoy your reading!
What do we need for this guide to work
We need of course some LoraWAN sensors and a Milesight UG65 gateway.
We need a Niagara station, which in my case is running on a Tridium Jace 8000.
For the HTTP part to work on Niagara, we need to install the "InnonHttp" module and license it (ask Innon to license a demo Workplace/Jace).
For the JSON parsing within Niagara, we need to install the "InnonJson" module and license it (ask Innon to license a demo Workplace/Jace).
Both the "InnonHttp" and "InnonJson" modules are available for sales at Innon Energy.
Compared to the Tridium official Http and Json options, the Innon one have got limited functionalities:
- The Json module only does the decoding part. For encoding messages, you will need to use the Tridium JsonToolkit module
- The Http module Servlet component only gets POST commands and does not respond to GET commands. For that you need to use the Tridium HttpClient module
- The Http module Client component is suitable for basic POST and GET commands to HTTP/S servers with basic authentications. If you need a more complex HTTP request to be built, you might need the Tridium HttpClient module
Preparing your Niagara Station: http port and user authentication
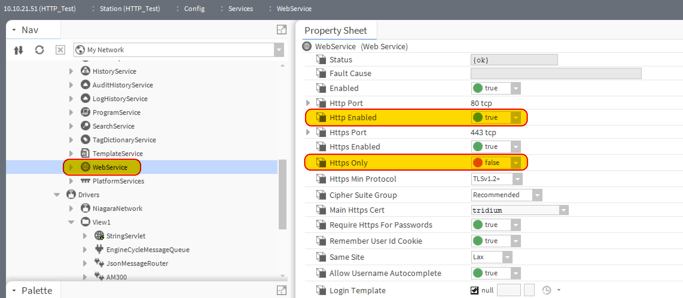
We would recommend to use HTTPS, as this setup would not require to add the Niagara station certificates on the Milesight gateway (so the configuration is the same and as simple as), but will make sure the traffic is encrypted in the network.
However, if you are using a safe local network and decide to use HTTP, make sure you change that setting in the WebService.
- "Http Enabled" is set to "true"
- "Https Only" is set to "false"
Another thing that we need to do is to add a basic authentication to our station.
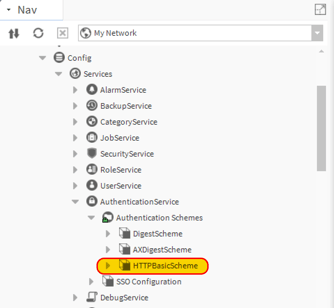
On the palette, open the "baja" palette. From there, expand the folder "AuthenticationSchemes - WebServicesSchemes". From there, drag a "HTTPBasicScheme" to your station, inside the "Services - AuthenticationService - Authentication Schemes" section. Your station should look like this:
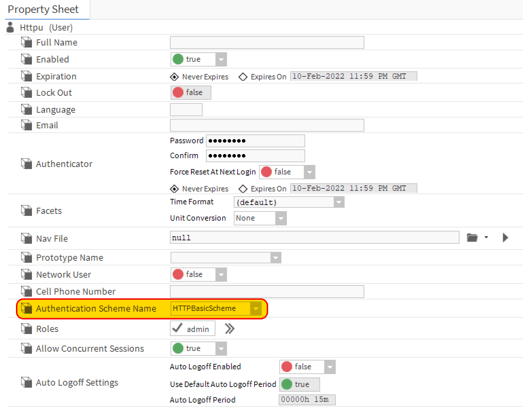
Lastly, we need to create a new station user, which we are going to use on our HTTP client to authenticate. My user is called "Httpu", with password "Innon12345". Note that on the "Authentication Scheme Name" I selected our new "HTTPBasicScheme". Note also the role assigned to this user needs to be able to access the desired section of the station. To simplify here, the user is an "admin", but Categories and Roles can be used to give specific access and improved security
Get an HTTP server instance running on the Jace
For our Jace to receive the HTTP POST messages from the Milesight UG65, we will need to create at least an entry point, an HTTP server.
Open the "innonHttp" palette. Drag a "TextHttpServlet" component in any preferred folder within the "Drivers" section of your station
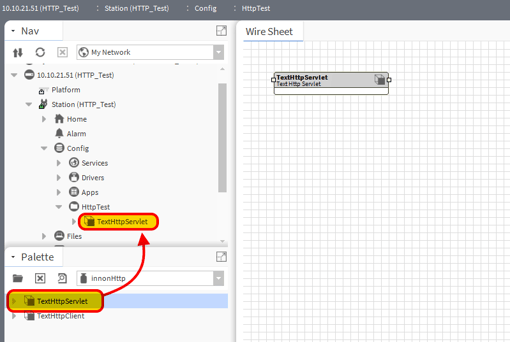
Now we can open the Property Sheet view of the TextHttpServlet component.
We need to make sure that:
- "Enable" is set to "true"
- Servlet Name is set. This will add to the overall URL on the client to identify the writing location. For example, here "LoraWAN" means the client will write the the URL http://10.10.21.51/LoraWAN
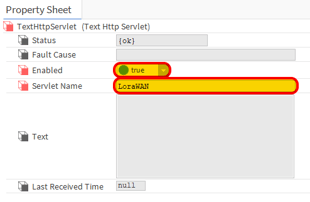
The "Text" slot is where our nice JSON payload is going to appear once we have configured the whole system
Configure the Milesight UG65: add our sensors
We will need to assume that you have at least started up your gateway, configured a user login and password and the network to access it. Also on "Packet Forwarder - General" you should have "Embedded NS" enabled and under "Network Server - General Setting" the first "Enable" flag should be present. Please refer to the UG65 manual for more information on this that we are not going to cover in this guide. This guide is going to summarise quickly how to add sensors, so you might want to refer back to the manual if you have any doubt with regards to this chapter.
Note: from firmware 60.0.0.41 on the UG65 and UG67, the "Applications" part has been split into "Applications" and "Payload Codecs". Applications is used to configure the MQTT/HTTP communication, while Payload Codecs is now used if you wish to use an existing sensor template or create a custom one, even starting from an existing template. We recommend to create a custom one so you can add the needed devEUI information within the payload. Keep reading and it will make more sense.
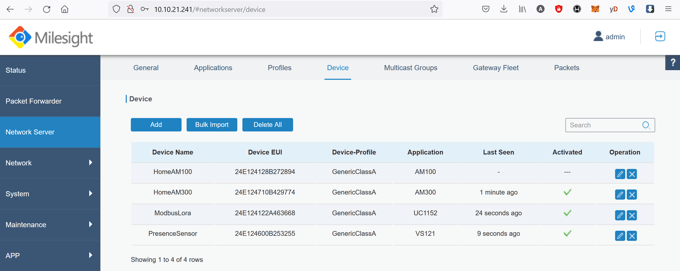
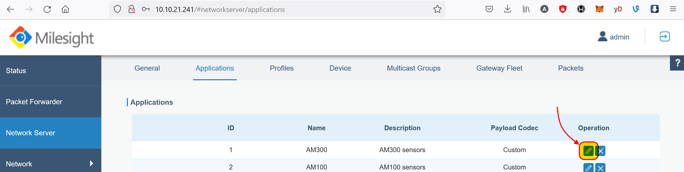
The first step on our UG65 configuration is on the "Network Server" and "Applications". Using the "plus" sign, we can add a new application for each new sensor type. You might want to have a dedicated application for each different type of payload decoder as a basic rule.
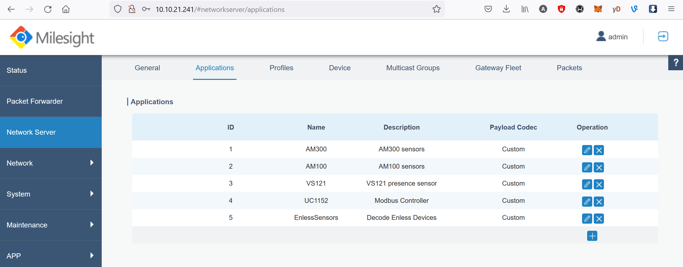
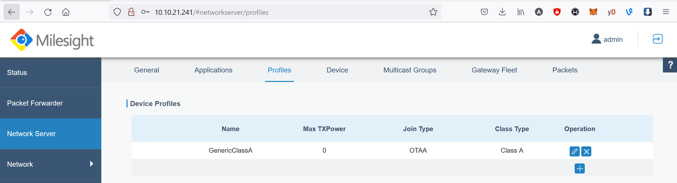
The UG65 manual will have more information on this, but before adding a sensor, you will need also to create a "Profile", to define the class and join type for your sensors. In my case my Milesight and Enless sensors all share the same profile
Once done, you can add your sensors using the Device EUI written on the sensor/box, the right Application Key (for Milesight it is defaulted as "5572404C696E6B4C6F52613230313823", for Enless it is written on the sensor) and selecting the correct "Application" and "Profile" from the list of the previously created ones. A green flag will appear once the sensor is communicating.
Configure the Milesight UG65: payload decoder and HTTP client
Now that we have our sensors connected, we need to go back to the "Network Server - Applications" section to setup our 2 main key elements: the payload decoder and the HTTP client.
Let's start as an example from my AM300 ambient sensor type. I can press the "pencil" button next to it and open the edit window
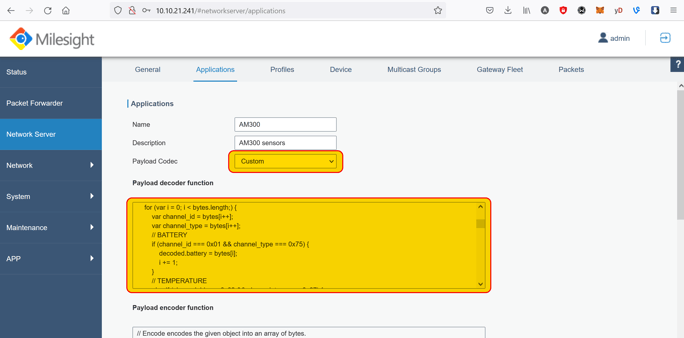
First thing to do, is to select the "Payload Codec" to be "Custom".
Below that, we will be able to add some Javascript code that allows to translate the base64 raw message from our sensors to a nice JSON payload. At Innon we provide the Javascript code for our sensors (Milesight and Enless), you can find them on our support.innon.com website ready for you to download.
Scrolling down on the same page, we can add up to 2 different "Data Transmission" clients. As you can see in my gateway I am pushing both via MQTT and HTTP, but for this guide I am going to use HTTP to connect to my Jace. Using MQTT will be very similar (you use the same decoder javascript code and the next part we are going to see below within Tridium is pretty much the same), but you will need to add a broker for the communication to work.
To add the Data Transmission on your empty settings you are going to use the "plus" button, I am going to press the "pencil" button so I can edit it and show you
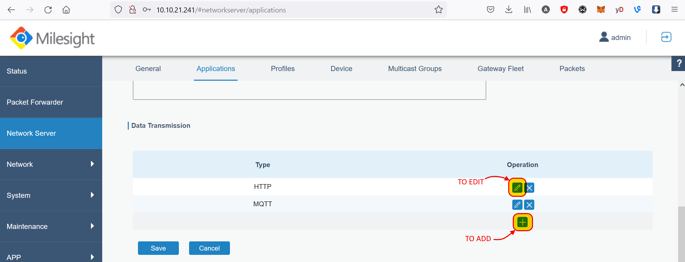
Within my editor window, I have got three sections I need to set.
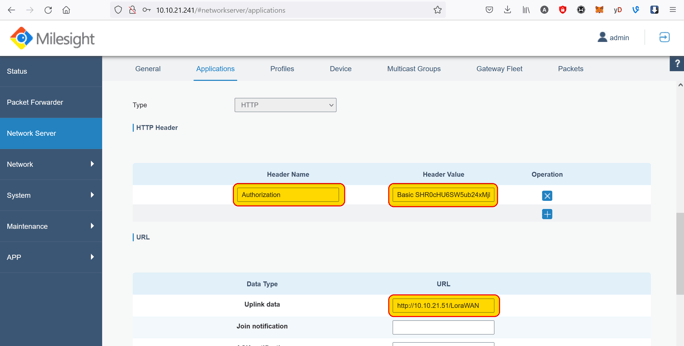
Adding one line for the HTTP header, I set the "Header Name" fixed as "Authorization".
For the "Header Value", it is composed of two parts: a fixed text "Basic " and then the Base64 encrypted conversion of the Tridium "username:password", in my case my username is "Httpu" and the password is "Innon12345". So going for example to THIS WEBSITE, I can insert the text "Httpu:Innon12345" on the string to be encoded, and the result will be "SHR0cHU6SW5ub24xMjM0NQ==". So, the full "Header Value" is going to be:
"Basic SHR0cHU6SW5ub24xMjM0NQ=="
As for the URL, it is going to be the IP address of my Jace and the "Servlet Name" combined as "http://10.10.21.51/LoraWAN"
Finally, get the message on Tridium parsed into slots
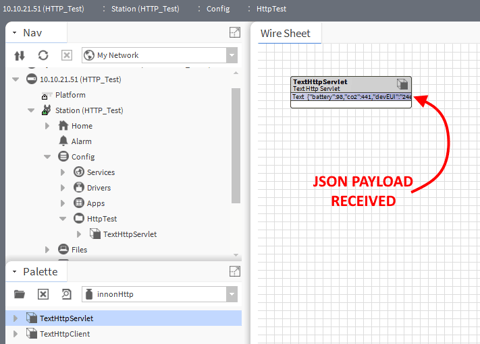
By now, if we go back to our Jace station, we should see that some sensor payloads are getting transferred across and appearing to the "Text" slot of the TextHttpServlet component (make sure you right click and select "Pin Slots" if you want to see the "text" slot on the wire sheet)
It is time to parse them into slots we can use on Niagara.
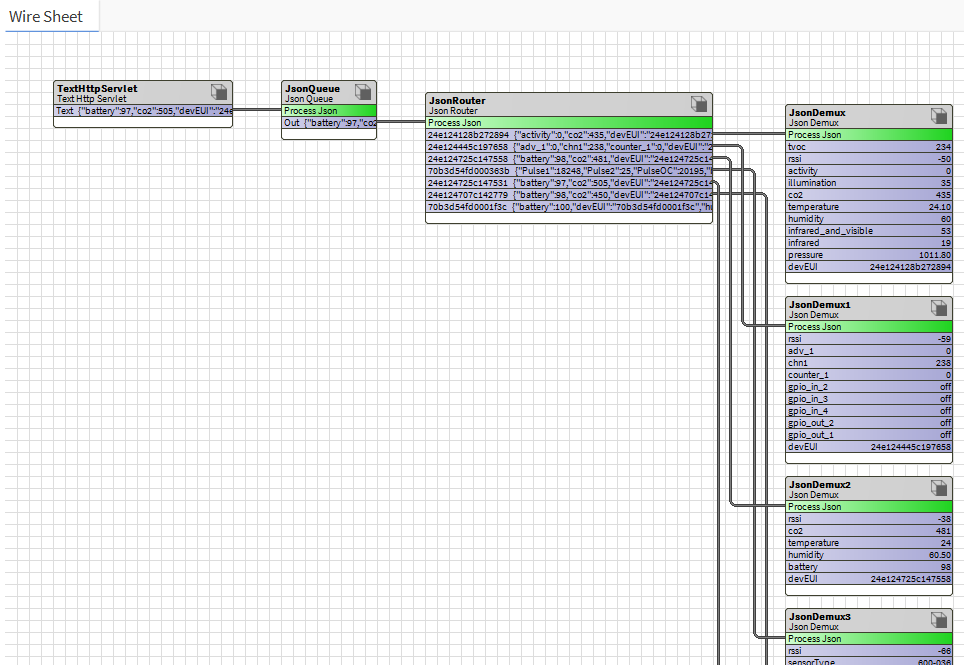
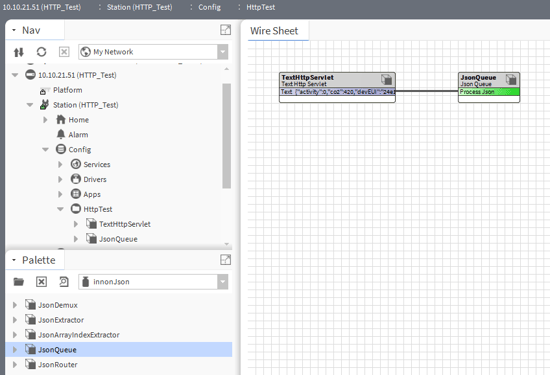
First step, is to "queue" our messages. We don't need to, but if many messages are sent across quickly, this will avoid missing one or more of them
Opening the "InnonJson" palette, you will see a small set of Json Decoding blocks.
I can drag a "JsonQueue" component to my wiresheet, and connect the "Text" of the TextHttpServlet to the "Process Json" of the JsonQueue block
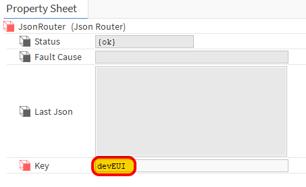
Our JSON payload contains the Device EUI within it. This is going to help now, allowing us to separate the messages we get from each sensor into separate dedicated output slots.
From the InnonJson palette, we drag a "JsonRouter" to the wiresheet. Open its Property Sheet and make sure you configure the "Key" slot as "devEUI", as shown below
Once saved, connect the "Out" slot of the queue block to the "Process Json" slot of the JsonRouter. Let it run for a while: for each new message coming from your sensors (with different "devEUI"), a new slot will automatically be created on the JsonRouter block containing the full payload of that sensor. Any new message coming from the same sensor will be updated on the same slot.

Lastly, all we need is to go back again to the "InnonJson" palette and drag a "JsonDemux" for each one of our sensors (connecting each sensor payload from the JsonRouter related slot to the Process Json of the JsonDemux block).
For every new message from our sensor, each one of these blocks will create a slot with the data of the JSON payload parsed, so it can be connected to any other Niagara point within your station