Introduction
From N4.9, Tridium introduced a special AWS Authenticator under their MQTT palette (abstractMqttDriver) to cater for the specific way AWS require clients to authenticate, i.e. to allow a connection to their cloud account in order to exchange data from the field/edge using an MQTT client, e.g. a Jace.
However, the certificate and private key AWS supply for authentication, as part of their "1 click" recommended method, causes Niagara N4 a problem as it does not allow the full chain of trust to be established due to not providing all required certification for this process. It would appear that AWS do not provide this as they see it as unnecessary due to the validation being carried out on their side, i.e. on their servers. The client is just using the certificate and key as a very secure way of authenticating itself to the AWS server.
Whilst some clients can work with this method, Niagara N4 stations cannot presently due to the AWS authenticator in the MQTT driver needing to select a device certificate from the Certificate Management area of the Platform. In order to place the certificate there initially, the full chain of trust is required which is not available (as previously explained). However, there is an alternative "Use my certificate" option available in AWS certificate creation which we have tested successfully with an N4.10 station. This is quite involved but we have detailed the process step-by-step, so go grab yourself a coffee and prepare for a bit of a lengthy read!Prerequisites
- You have a Windows PC or laptop with internet connection
- You or your customer have an AWS account with a suitable login for configuring Things and certificates
- You have Workbench and a Niagara Station version 4.9 or above installed/available with outgoing internet access
Laptop Preparation
In this section we will cover loading openSSL and AWS CLI onto your laptop which are required for certificate creation, signing and verification. This will essentially allow you to be your own certificate authority (CA) and prepare certificates compatible with both AWS and Niagara N4.
Install openSSL on your laptop/PC
- Go to http://slproweb.com/products/Win32OpenSSL.html and download the correct version for your Windows, 32 or 64. Open and install using default options
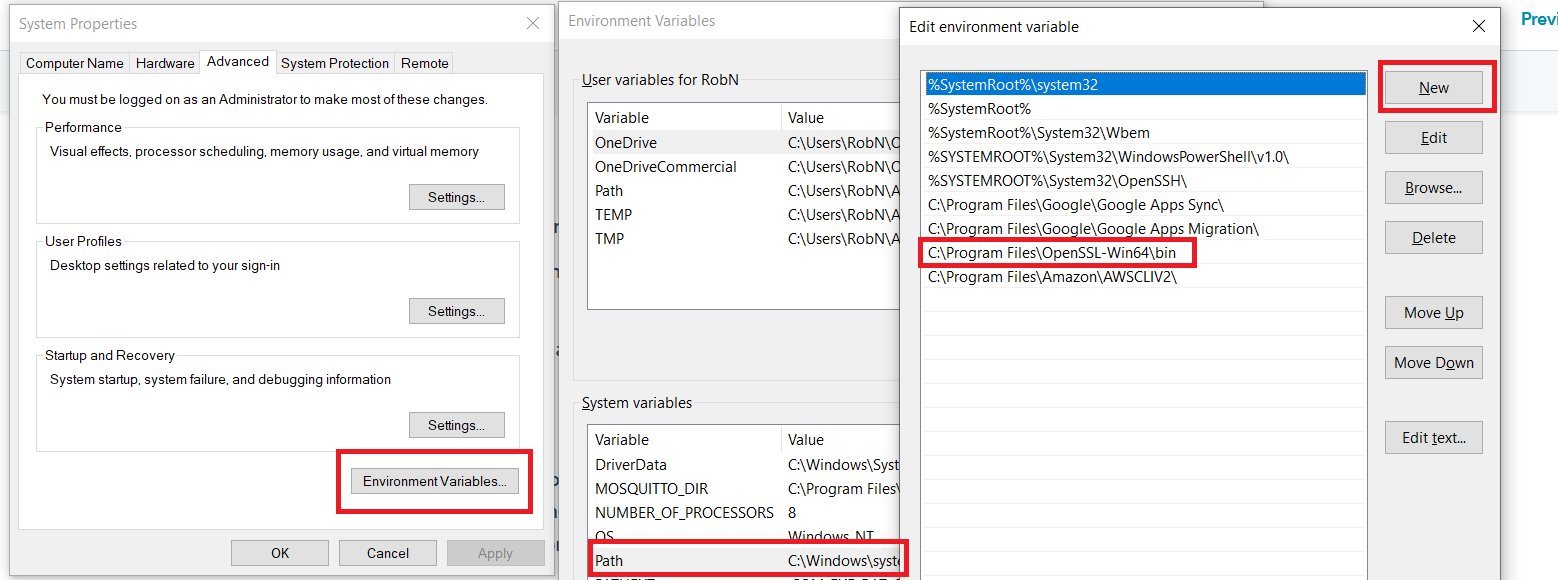
- Click on Windows Start button or click in Windows Search and type "View advanced system settings" and click on program with same name
- Click on "Environment Variables" then double click on "Path" under System variables then "New" and type in the path to openSSL bin files shown in red box and press OK -
Install and configure AWS CLI (command line interface)
- Download from here https://aws.amazon.com/cli/ following relavant instructions
- Sign into AWS Console and click your username dropdown (top right) and select "My Security Credentials"
- Click on "Access Keys" and press "Create New Access Key". Save in Notepad file
- Open command prompt (type cmd in Windows search or after clicking Windows Start button)
- Enter "aws configure" (without quote marks) press return
- Enter codes from step 3
- Enter the AWS region where you are deploying your "Thing" (e.g. eu-west-2)
- Set output to "json"
CA Creation and Registration
This step will effectively set you up as a CA and register your CA certificate with AWS. This should usually only need to be carried out once for any given AWS account. The CA certificate will also be used to sign your device/Thing certificates and keys in a later stage so AWS can verify them - the key file should be stored securely and not distributed to other parties
Creat CA certificate
- From the command prompt -
- Generate key file - enter "openssl genrsa -out awsca.key 2048"
- Create certificate from key file - enter - "openssl req -new -x509 -nodes -key awsca.key -days 500 -out aws-ca-cert.crt"
- Enter as much meaningful data as you can into the fields as they appear - it's not crucial but can be helpful later to identify the certificate and its use
- You will now have the two files stored in the directory you were using the command prompt from, e.g. c:\Users\Yourname
Register with AWS
- From the command prompt -
-
Get your AWS registration code, enter - "aws iot get-registration-code"
- The code will be returned as "registrationCode":"your-registration-code-in-this field" - copy the text inside the quote marks on the right of the colon
- Create a verification key, enter - "openssl genrsa -out verificationCert.key 2048"
- Create certificate from verification key WITH registration code from AWS, enter - "openssl req -new -key verificationCert.key -out verificationCert.csr"
- Leave all fields blank EXCEPT the "Common Name" - enter the AWS registration code from step b. here
- You will now have a file called "verificationCert.csr" stored in the directory you were using the command prompt from, e.g. c:\Users\Yourname. This is a certificate signing request.
- Sign the above using your CA certificate and key, enter - "openssl x509 -req -in verificationCert.csr -CA aws-ca-cert.crt -CAkey awsca.key -CAcreateserial -out verificationCert.pem -days 500 -sha256"
- You will now have a file called "verificationCert.pem" stored in the directory you were using the command prompt from, e.g. c:\Users\Yourname. This will be used to verify your CA certificate with AWS in the next step
-
- In AWS Console, go to "Secure", then "CAs" on left hand menu then select "Register a CA" then "Reigster a CA" again. Here you will see some detailed instructions of the steps you just carried out above, scroll down to step 5 and 6
- Click "Select CA certificate" and select "aws-ca-cert.crt" you created in earlier section
- Click "Select verification certificate" and select "verificationCert.pem" you created in earlier section
- Check "Activate CA certificate" and "Enable auto-registration of device certificates" boxes at bottom then click "Register CA certificates"
You have now created and registered your CA certificate that will be used to vallidate any device/Thing certificates you need to create going forward. In the next sections, we will setup a "Thing" in AWS to allow an N4.10 station to connect and push MQTT data to the cloud and finally set up the N4 Station to connect to AWS
Prepare AWS to Accept N4 Station Device MQTT Connection
Create a Device/Thing certificate
- In command prompt enter - "openssl genrsa -out deviceCert.key 2048"
- Enter "openssl req -new -key deviceCert.key -out deviceCert.csr" to generate a signing request from above key file
- Enter "openssl x509 -req -in deviceCert.csr -CA aws-ca-cert.crt -CAkey awsca.key -CAcreateserial -out deviceCert.pem -days 500 -sha256" to sign the above request with your CA certifcate and key
You now have a signed device certificate "deviceCert.pem" ready to upload to AWS for your new Thing
Create new AWS Thing
- In AWS Console go to "Manage/Things" then press "Create"
- Click "Create a single thing"
- Name the device, e.g "MyN4Station" and then click "Next"
- You will land on the certificate creation menu, select from "Use my certificate" "Get started"
- You should see the CA certificate you uploaded to AWS from previous steps in a list - click the check box against your CA certificate and press "Next"
- You will land on the device certificate page, click "Select certificates" and choose your "deviceCert.pem" created from previous steps
- Click the round "Activate" option radio button on the right of the certificate in the list and click "Register certificates"
Create AWS Policy
- In AWS Console, select from menu on left, "Secure/Policies" then click "Create"
- Name your policy to identify its use, e.g. "MyN4Station"
- In "Action" field enter "iot:*"
- In "Resource" field enter "*"
- Under "Effect" check "Allow" option and then click "Create"
Attach Certificate to Policy
- In AWS Console go to Secure/Certificate
- Find your certificate you just created and click on it
- From the "Actions" drop-down (top right) select "Attach policy" then check the policy you created in previous step then click "Attach"
Configure N4 Station to Connect to AWS Thing
Get endpoint from AWS for your Thing
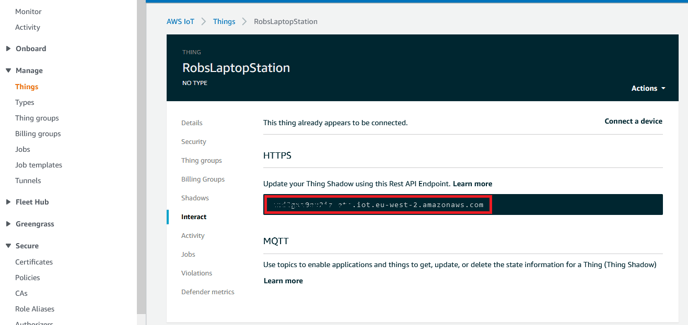
- In AWS Console, go to Manage/Things then click on your Thing ("MyN4Station") then select "Interact" on left menu
- Select the text in the red box shown below and copy to clipboard and save in a text file
Combine device key and certificate files
- In your directory you were using openSSL from, find -
- deviceCert.key
- deviceCert.pem
- Open both in Notepad then open a new text file and name it "deviceCertChain.pem"
- Select ALL text from "deviceCert.key" and copy into "deviceCertChain.pem"
- Select ALL text from "deviceCert.pem" and copy into "deviceCertChain.pem" on the line under "-----END RSA PRIVATE KEY-----"
- Save "deviceCertChain.pem" and close the others
Configure N4 Station to connect to AWS Thing
- In Workbench, connect to the Platform hosting the Station and make the following settings
- Under "Certificate Management" "User Trust Store" tab click "Import" and select the "aws-ca-cert.crt" certificate file from the directory you were using openSSL from, e.g. c:\users\yourname. The certificate should import and get a green tick
- Under "Certificate Management" "User Key Store" tab click "Import" and select the "devicecertchain.pem" certificate file from the directory you were using openSSL from, e.g. c:\users\yourname. The certificate should import and get a green tick
- In Workbench, connect to your station and add the "abstractMQTTDriverNetwork" to your Drivers
- Open the abstractMQTTDriver palette and from devices drag an "AwsMqttDevice" onto the "abstractMQTTDriverNetwork"
- In the AX property sheet of the AwsMqttDevice make the following settings -
- Topic for LWT - set a random topic for now, e.g. "niagaraLWT" so an error is not created. (this can be specifically configured later if it is important to the application to use the "last will and testament" feature of MQTT)
- In the "authenticator" section of the device make the following settings -
- Broker Endpoint - copy and paste the endpoint you saved from the "Get Endpoint from AWS for your Thing" steps above
- Client ID - this needs to be unique for your AWS account, use the Thing name or a known unique ID
- Broker port - 8883
- Certificate Alias - select the devicecertchain pem/certificate file you previously imported into the User Key Store
- Click Save
- Right click on "AwsMqttDevice" and select "Action" then "Connect" - "Status Message" should change from "Disconnected" to "Connected" after a short time
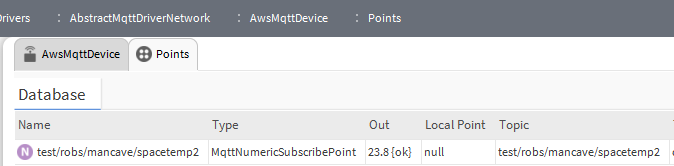
- You can now set up points under the AwsMqttDevice to publish and subscribe to your AWS account with whatever topics you choose. Here's some screen shots of a test publish and subscribe I set up; a Jace with Link IO is publishing temperature data and a PC station is subscribing to it -
AwsMqttDevice Settings -

Jace Publish Point Config

Laptop Station Subscribe Point Config
AWS - Monitoring the Jace publish by subscribing using "Test"
