Why the guide and what is Zerotier
When operating remotely via 4G SIM cards or using customer internet connections, the main problem is accessing the site remotely.
No matter if you want to just access a site local device from your computer, or you would like to create a network between sites, you typically need at least 2 things:
- a secure connection, so that traffic is encrypted and the sites are only accessible to you and not publicly available on the internet
- a static point of access (a static IP)
Zerotier is a service that allows to create networks between devices (clients) connected to the internet.
It uses a central service online to configure these networks with an intuitive portal, and each client (a Teltonika router or a PC via the Windows Client) can connect to a network very easily.
Clients will be able to connect to Zerotier with pretty much any internet connection, static/dynamic IPs, NAT/behind a firewall. The only port used by the client to connect with the Zerotier server is port 9993 UDP outbound, so it is very unlikely you will have problems with your internet connection or any SIM card.
You shouldn't need to be an IT engineer to configure Zerotier. This guide has everything you need to get you up and running.
If you want to know more about Zerotier and to download the Windows client in preparation, check up their website here: https://www.zerotier.com/
Network topology
This article is going to tackle the simplest connection type: a cloud network between sites and PCs.
Each Teltonika router will have an IP assigned by the Zerotier cloud network.
Also each PC connecting to the same network will receive an IP address within the same range, so all the Teltonika routers and PCs will be connected within the same virtual network
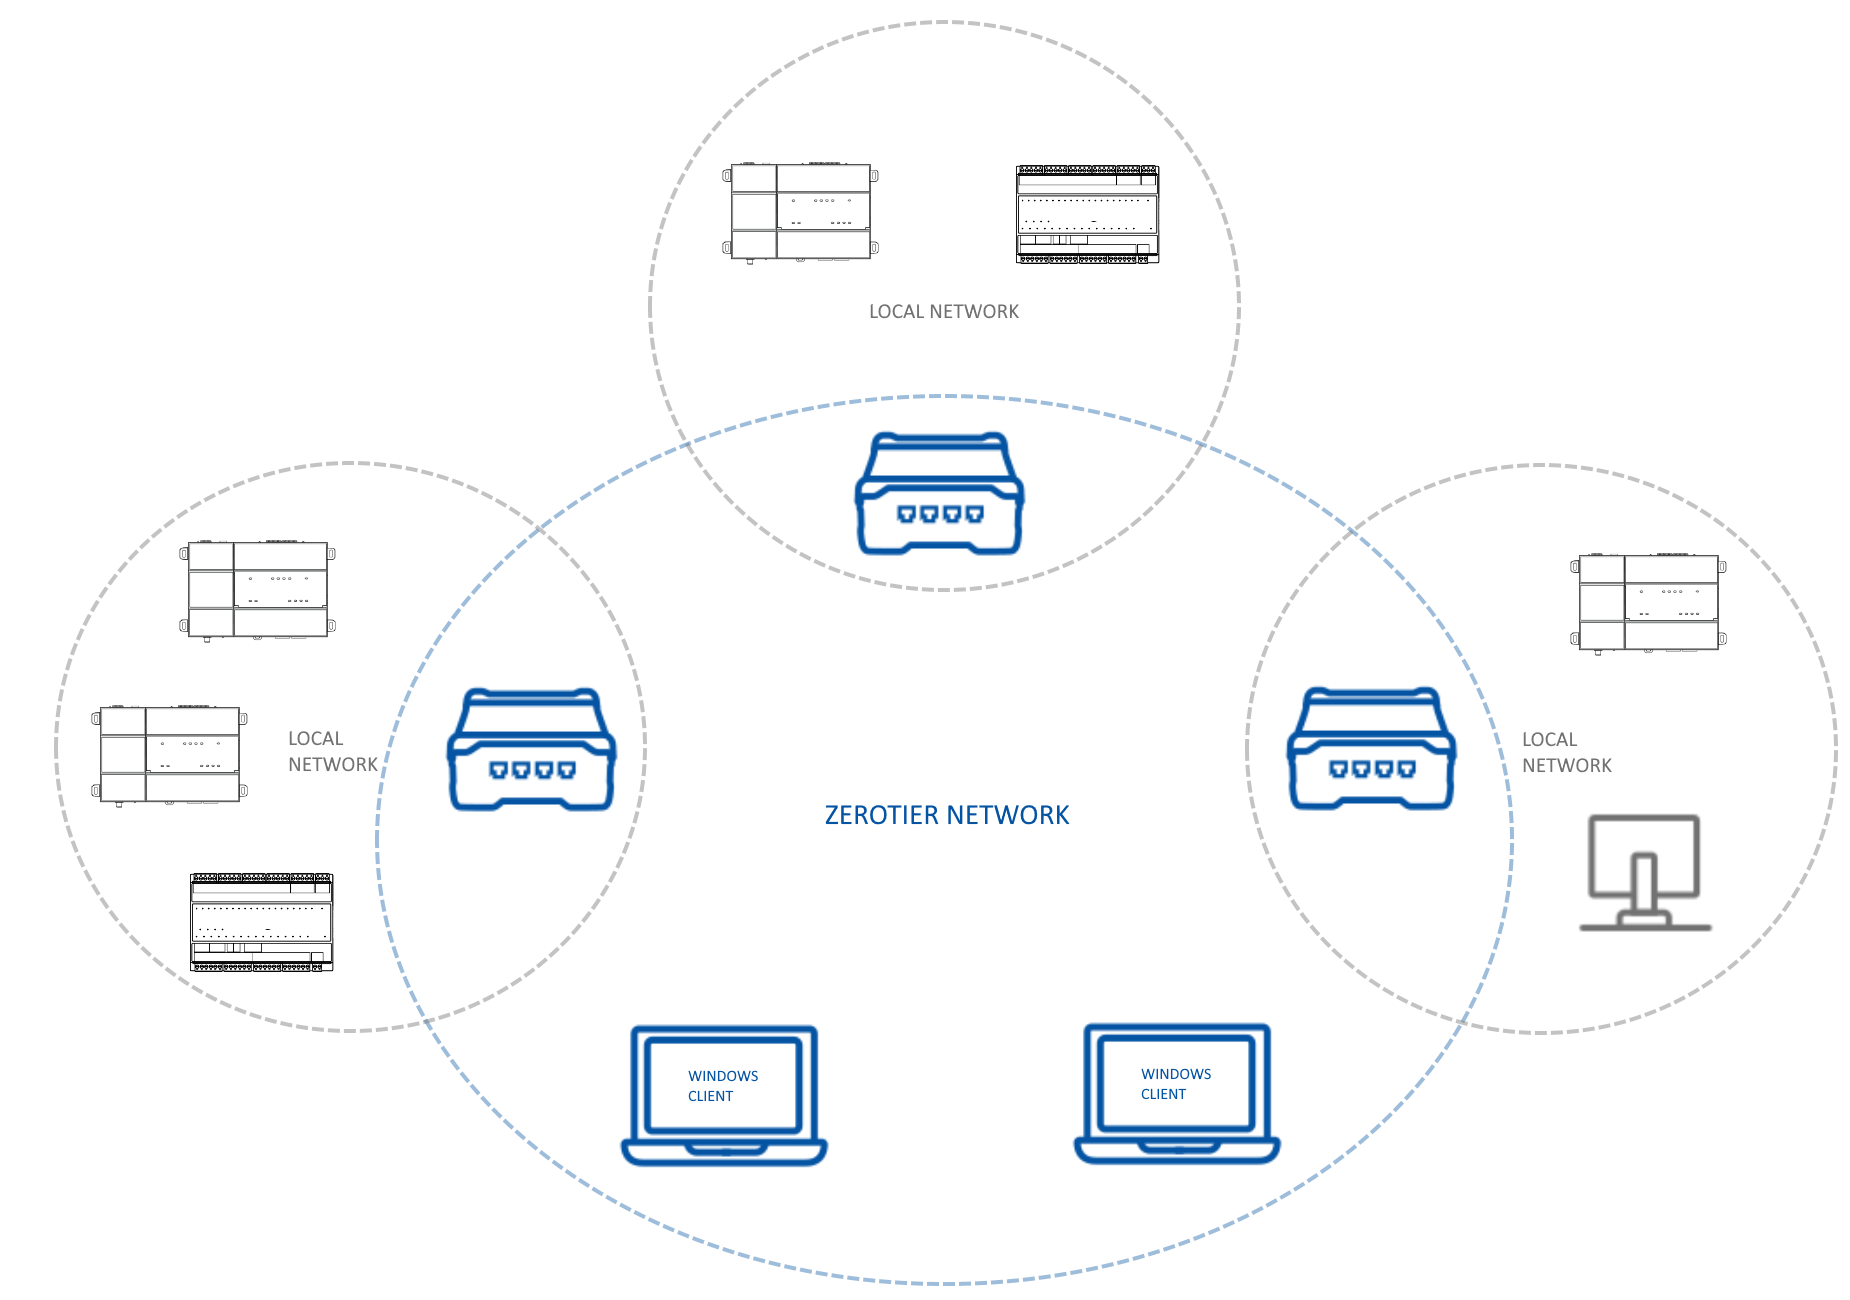
Each Teltonika also has a local network with local devices, which we want to be able to access from the Zerotier network. For this purpose, we are going to set up firewall rules on the Teltonika so that we can access our local devices using some selected ports.
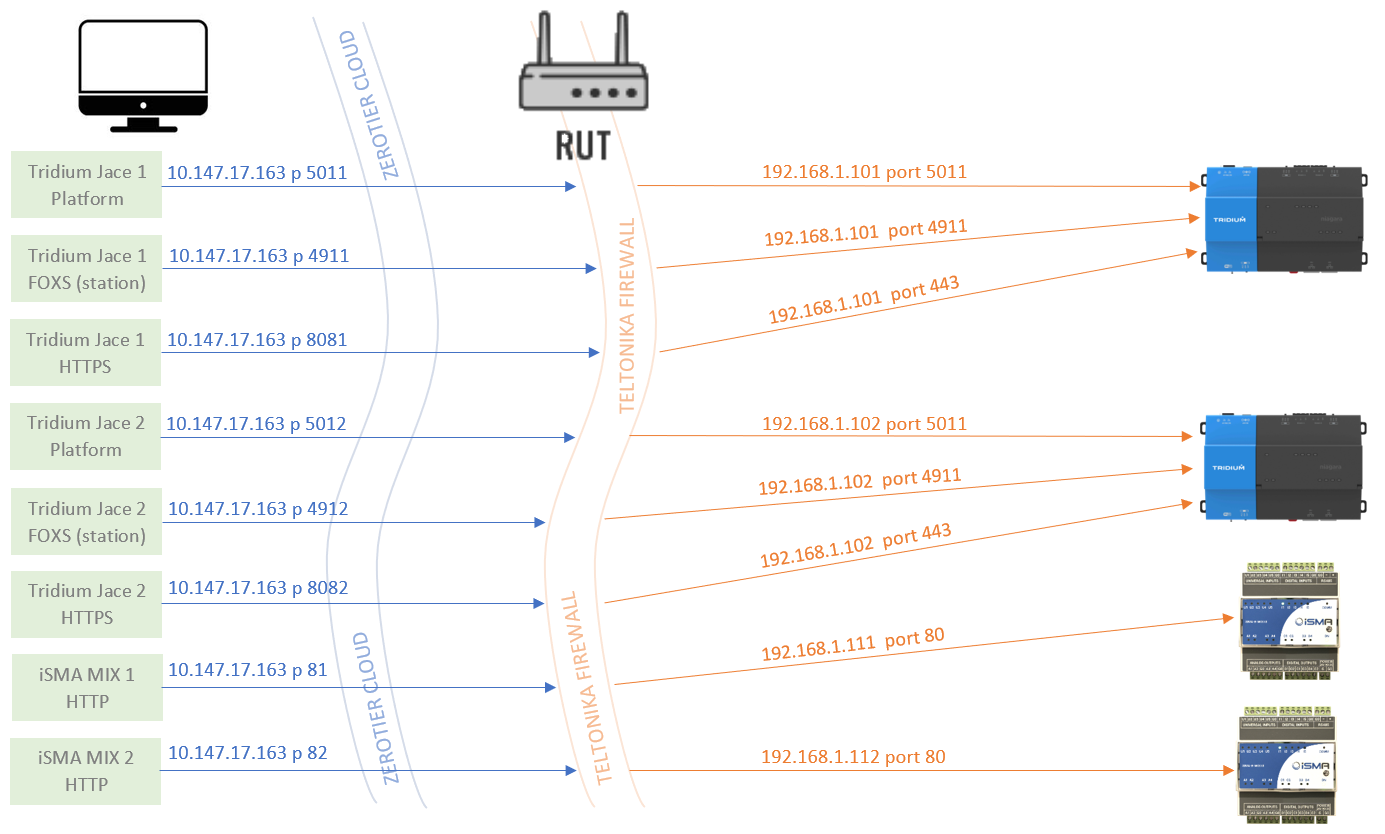
In our example, we are going to access the following devices and services in the local network:
- Tridium Jace 8000 n.1 with IP address 192.168.1.101
- FOXS 4911 port (accessing the station)
- Platform Secure 5011 (accessing the platform)
- HTTPS 443 (accessing the web interface)
- Tridium Jace 8000 n.2 with IP address 192.168.1.102
- FOXS 4911 port (accessing the station)
- Platform Secure 5011 (accessing the platform)
- HTTPS 443 (accessing the web interface)
- iSMA MIX18 IP n.1 with IP address 192.168.1.111
- HTTP 80 (accessing the web interface)
- iSMA MIX18 IP n.2 with IP address 192.168.1.112
- HTTP 80 (accessing the web interface)
The Teltonika router will be using the default IP address 192.168.1.1
First step: configure a Zerotier cloud network
First, create an account with Zerotier if you do not have one already.
From the "Networks" section, you can press "Create A Network".
Click on your network ID just created to access the settings

The "Network ID" is going to be the access code you will use on every client to connect to this network.
Once inside the network settings, proceed to configure the "Name" for this network and make sure it is set to "Private"

The difference between "Private" and "Public" is that with a "Public" network, any client that attempts to connect to the network will be granted access by default. When set as "Private", the network will only accept clients once the user flags them as "Authorized" on their first connection attempt. We will see this later.
Scroll down on the network settings and select the "IP range" you want to use for your SD-WAN network. Each client will get an IP address within that range
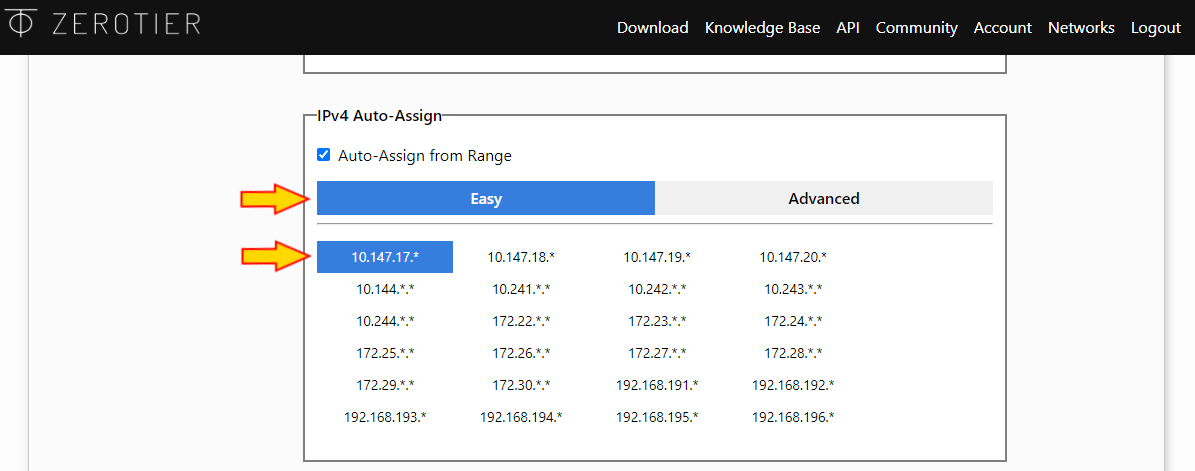
Note on IP addresses
Your clients will have multiple networks to access and each network should use a different IP range. If your local networks on the Teltonika routers are using "192.168.1.*" (like in our example), the Zerotier network should use a different range, and your engineering laptop (which is most likely connecting to the internet over WiFi or LAN) should have the local WiFI or LAN network IP range different again, to avoid clashes.
Configure the Teltonika Zerotier client
The first thing we need to do is to install the Zerotier client on our Teltonika router.
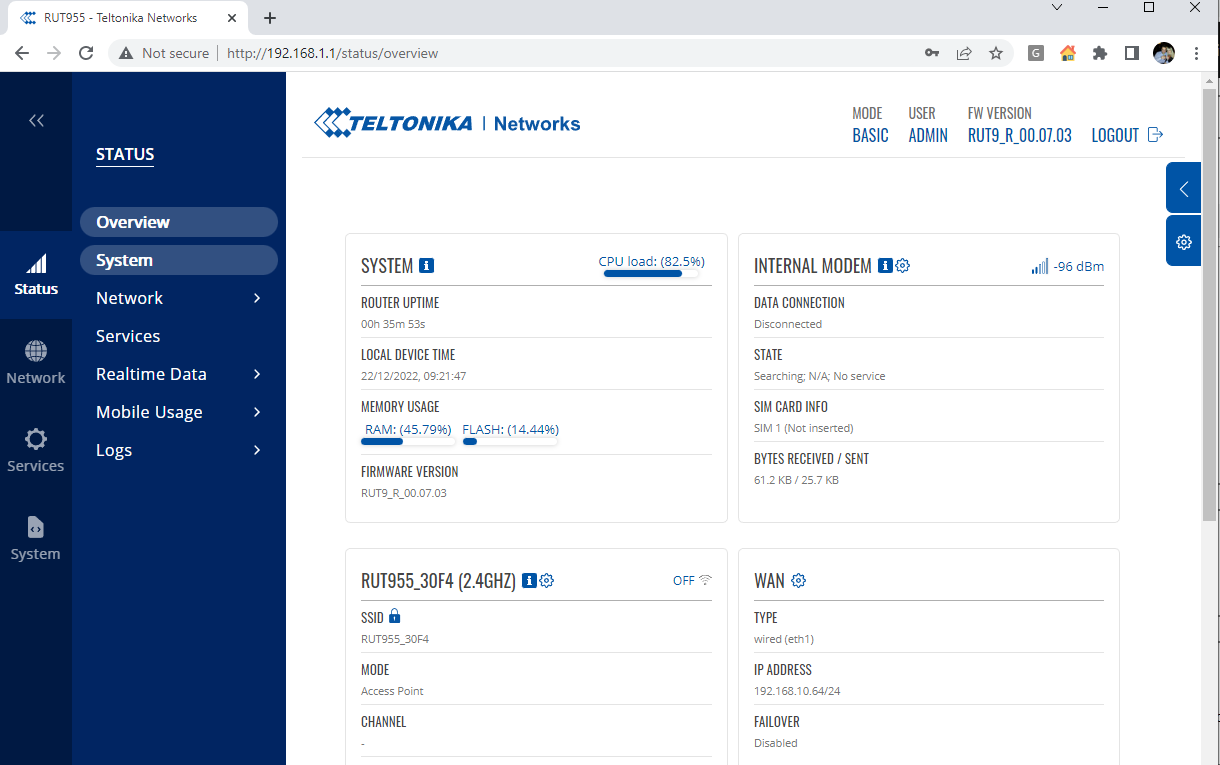
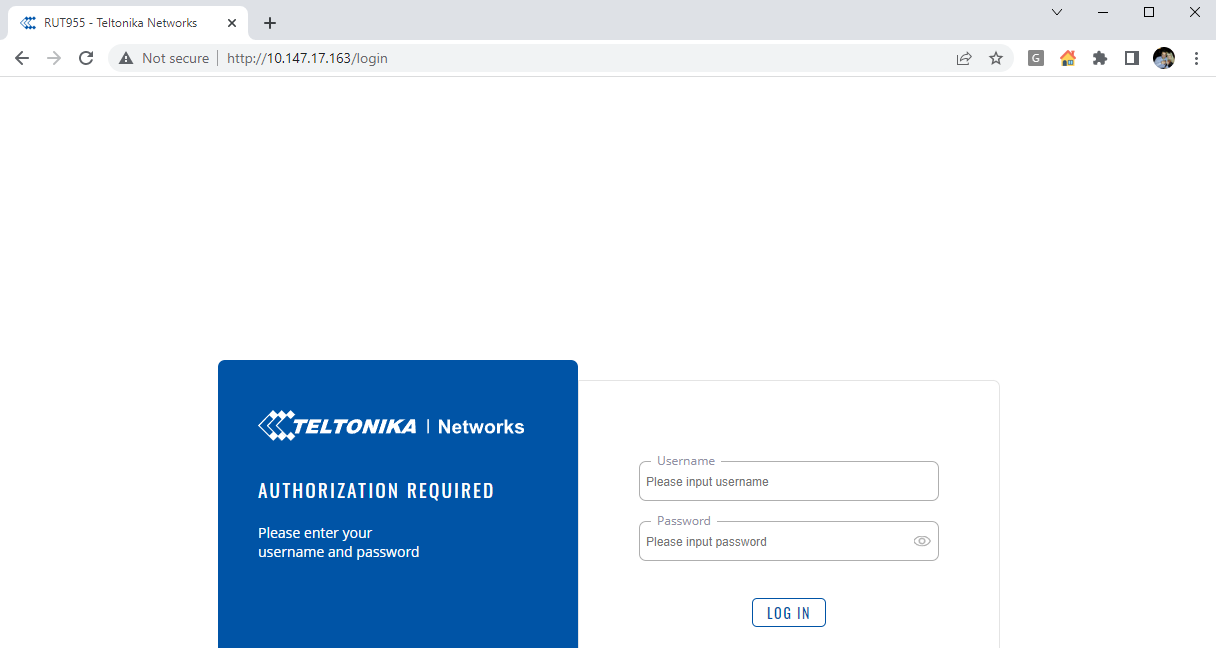
Login to your router using the browser (default access credentials are user "admin" password "admin01").
The firmware version used in this guide is 00.07.03, and we are connected to the internet using a wired WAN connection. A 4G SIM card would work exactly the same, just make sure you run through your first setup and get the router connected to the internet and ready for the next steps
To install now the Zerotier client, go to "Services - Package Manager - Packages"
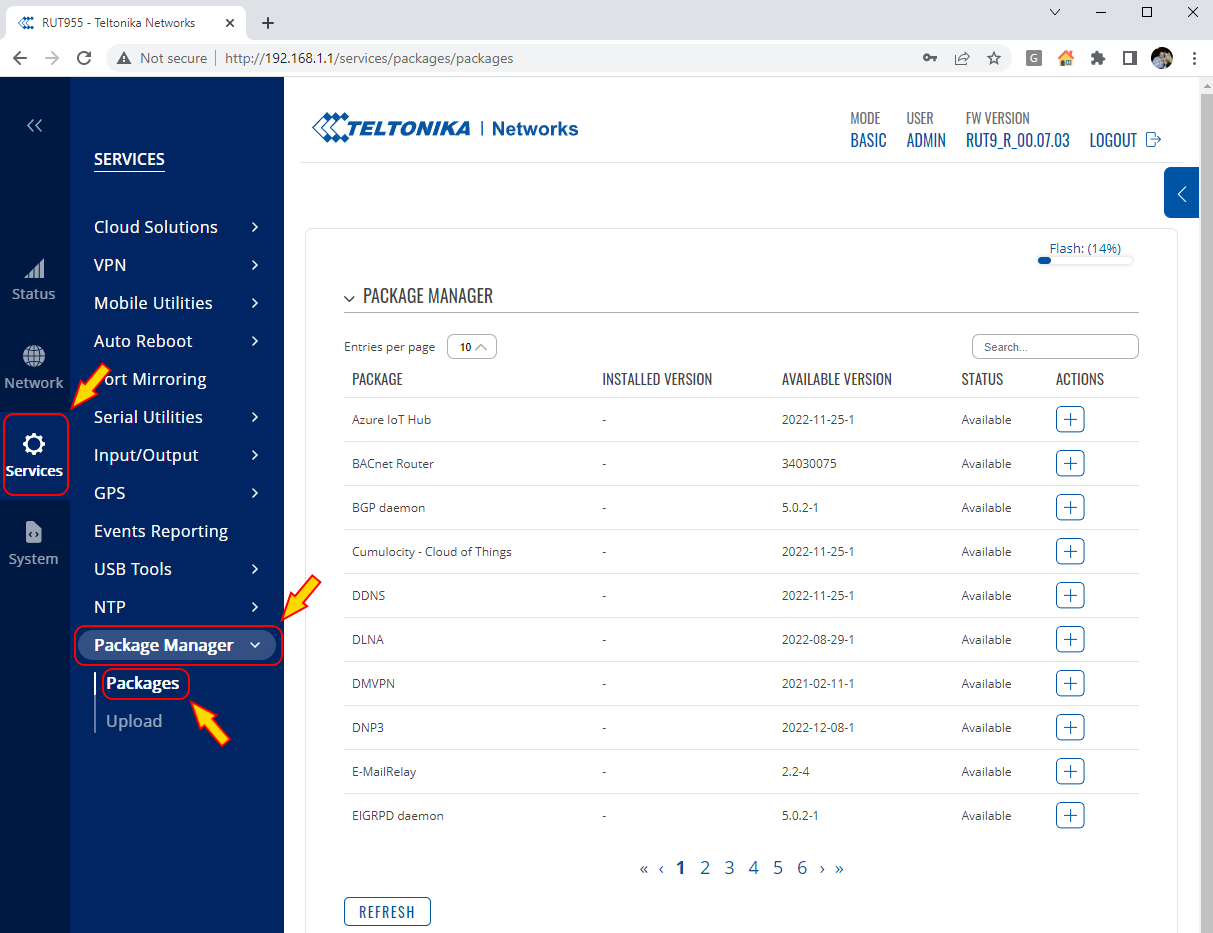
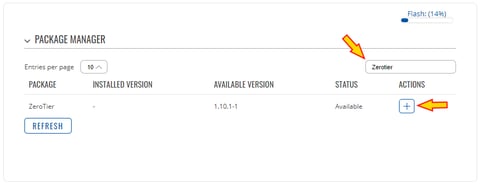
Search for the "Zerotier" package, then press the "+" button on the right to install it
Confirm the installation clicking the button "Continue" and allow the system the time to run through the entire process
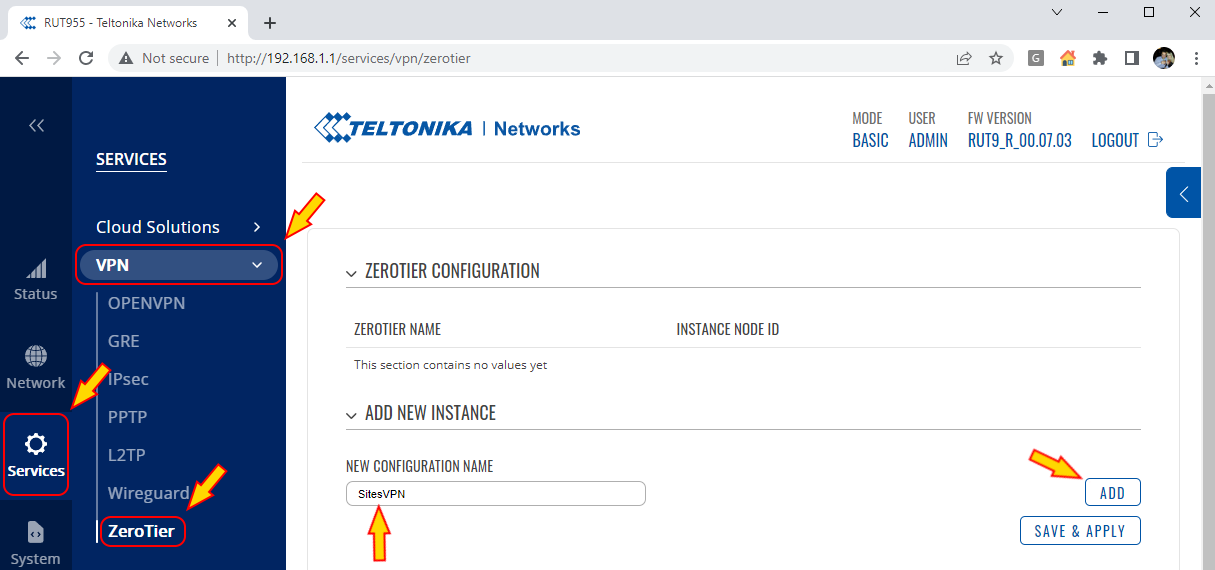
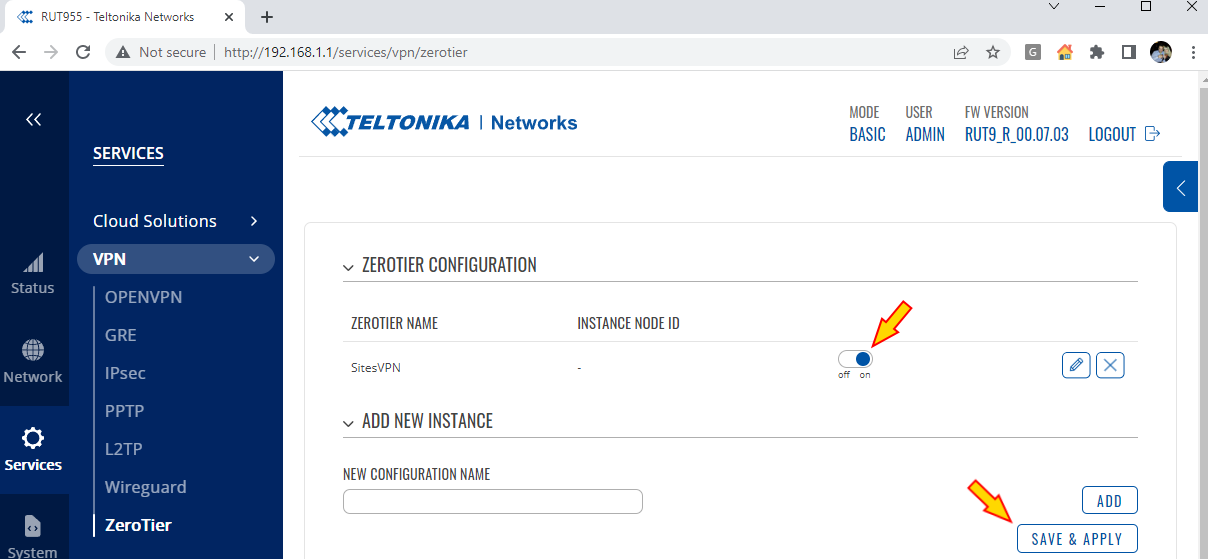
Once the client is installed, we can configure it on "Services - VPN - ZeroTier"
To start, add a "New Configuration Name" and press the ADD button on the right, so we can set up our Zerotier client
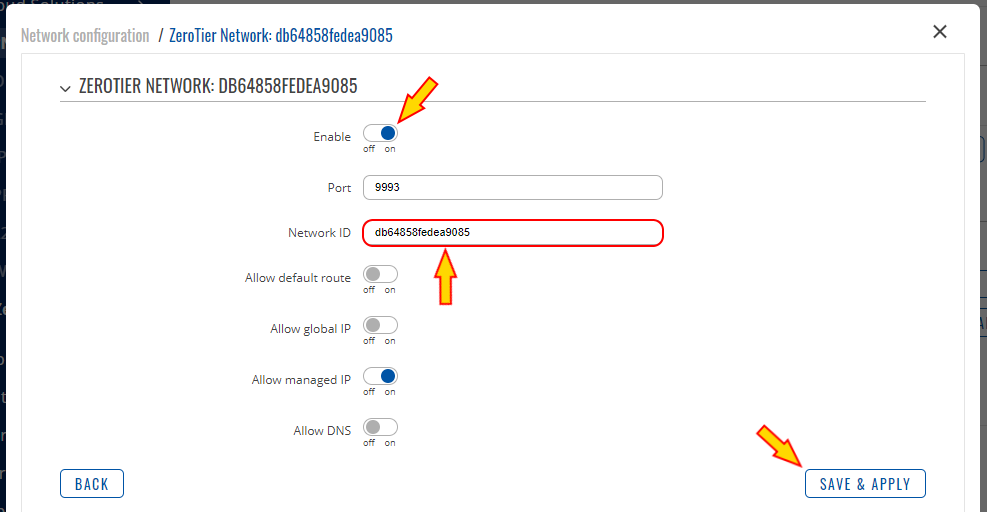
On the pop up window that opens, put a network desired name inside the space "Add New Network" (I use the Zerotier "Network ID" which you can find it on the top of your Zerotier network configuration website) then press ADD on the right
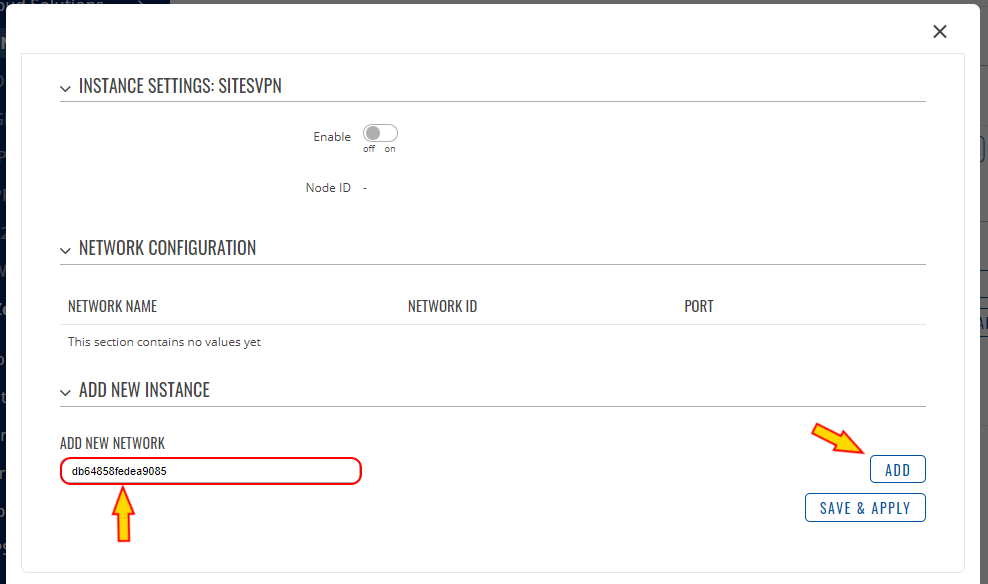
On the next window, make sure you switch the Enable to "on", put the Zerotier Network ID in the "Network ID" text box, then press SAVE & APPLY to complete
Make sure you also "SAVE & APPLY" the next overall Zerotier VPN windows
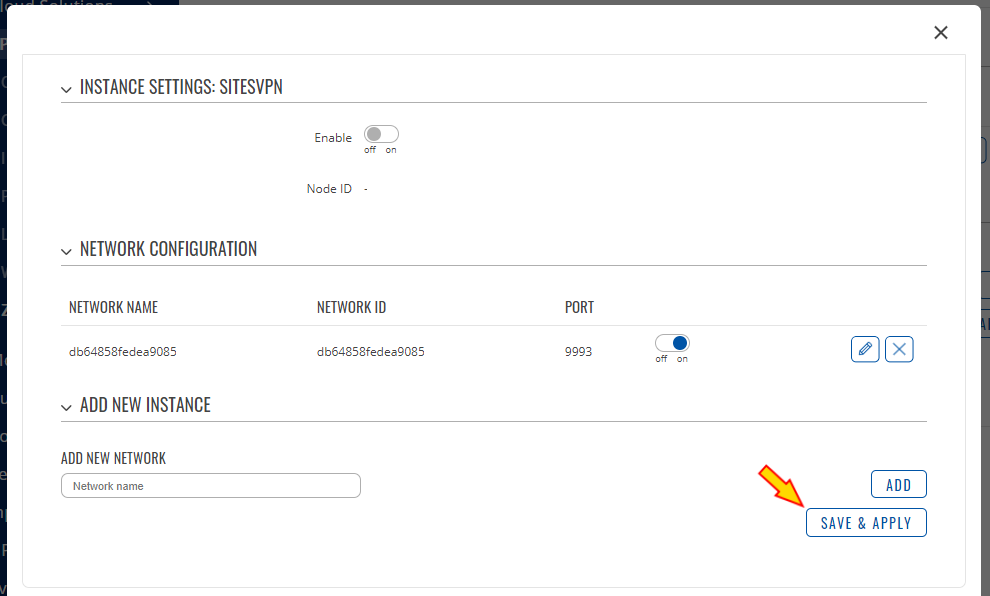
Switch your Node "on" and hit SAVE & APPLY again
Configure the Windows PC client
Download and install the Windows PC client https://www.zerotier.com/download/
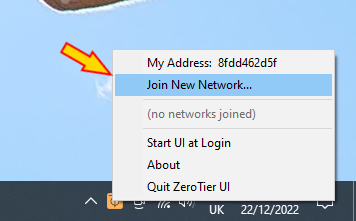
Once installed and running, the client will be visible as an icon on the System Tray, next to the time and date on the bottom right corner of the screen.
Right click on it to open the options menu and select "Join New Network" to add the previously created Zerotier network
Input the Zerotier Network ID and click the button "Join"
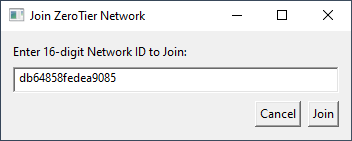
You should see now a flag next to the network just created, highlighting the network is online

Authorizing the clients on the Zerotier server
To make sure both the Windows client and the Teltonika client are both connected, we need to go back to the Zerotier website to enable them and verify the IP address that has been assigned to each one of them.
Scroll down to "Members" and put the flag on the "Auth?" box of your 2 new clients connected.
Add also a Name and Description to each one of them.
Finally, note the IP address that has been assigned to each client:
- Teltonika router has been assigned IP 10.147.17.163
- The Windows PC has been assigned IP 10.147.17.250

Opening a terminal window on my PC, I can try pinging the Teltonika router remotely now at its IP 10.147.17.163
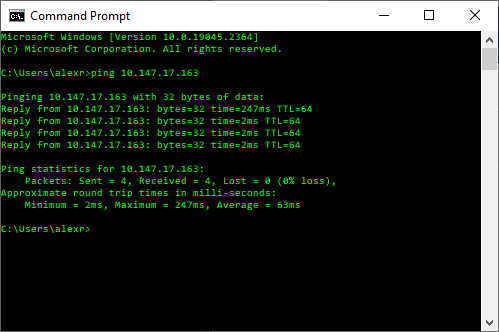
The Teltonika router is also accessible remotely by using the Cloud IP address
Accessing local devices by setting up rules on the Teltonika firewall
We have now a Windows PC and Teltonika router both online on the Zerotier cloud IP network, they see each other.
Now it is time to set up some firewall rules on the Teltonika so we can access our 2 Tridium Jaces and our 2 iSMA IP local devices from another Zerotier client (like our PC in the example below).
What we are aiming for is to create a set of ports that we can use from any other client (in this case our Windows PC, on the left side of the image below) that we program on the firewall rules of the Teltonika router, so when trying accessing those ports the Teltonika will know which device and service (port) we want to access within its local network
Ok let's start configuring the firewall rules.
Important step: change the MODE on the top right of the Teltonika page from BASIC to ADVANCED by just clicking on it

First rule: Jace 1 Platform port
This is simple, the port used externally and locally are the same (5011 to 5011)
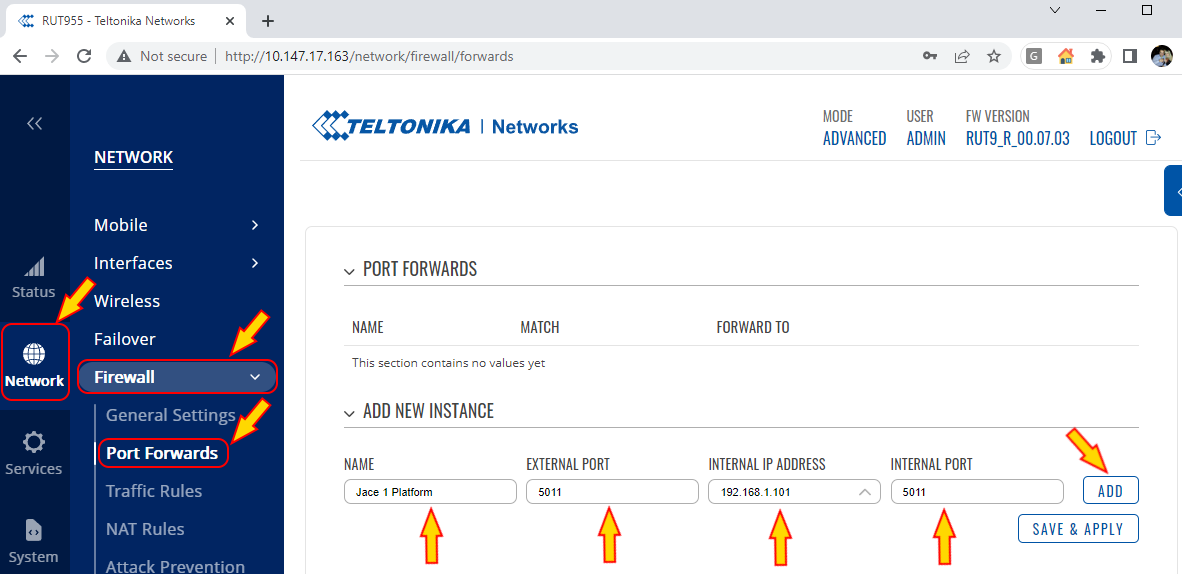
To get to the firewall port forward settings, go to "Network - Firewall - Port Forwards".
Add your first rule by giving it:
- a generic Name of your choice (Jace 1 Platform)
- an External Port used to get in (5011 for this device, Jace 2 will be assigne a different external port)
- the Internal IP Address of the local device (Jace 1 is IP 192.168.1.101)
- an Internal Port used by the local device for that service (5011 is our platform service port)
Then press ADD
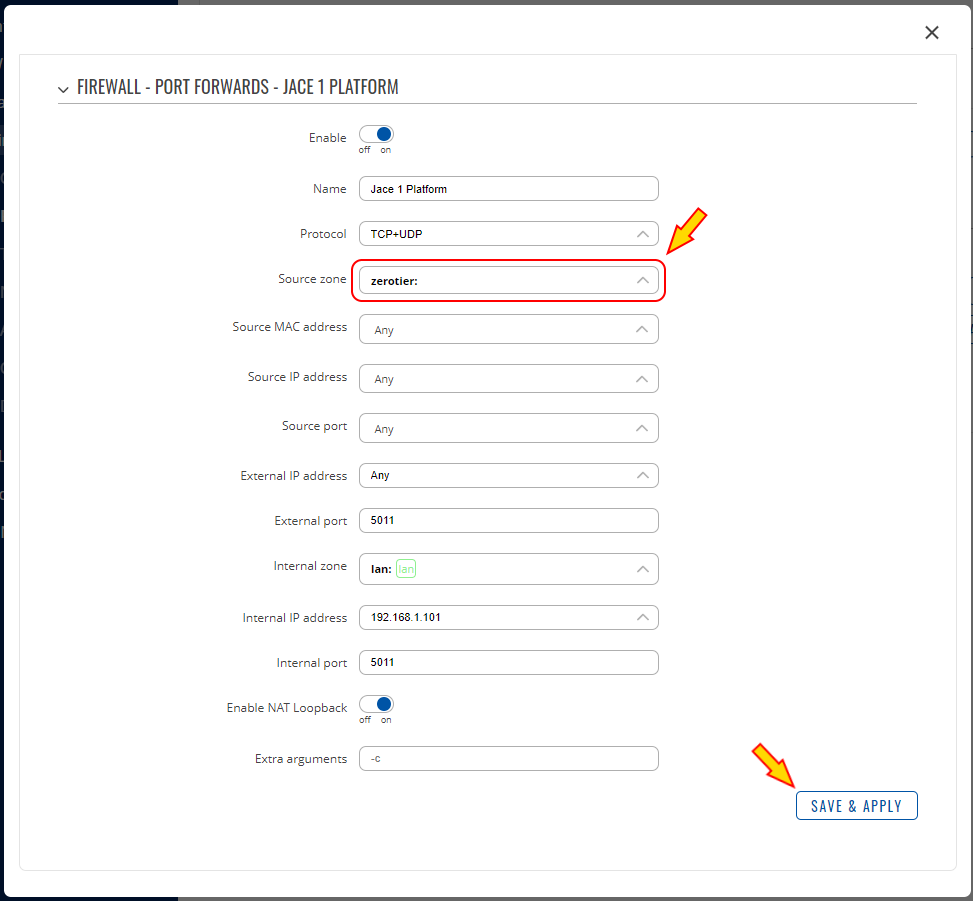
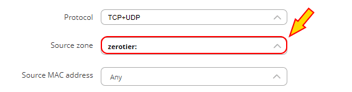
Because we correctly enabled the ADVANCED MODE, an essential option is available on our port forwarding rule: the Source Zone
This by default is using the WAN (internet) source, but we will change it to use "Zerotier" instead
The rest should be all good, so we can SAVE & APPLY this rule
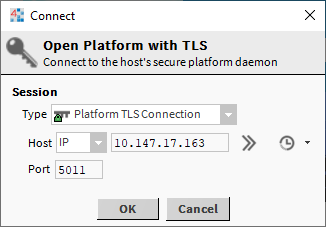
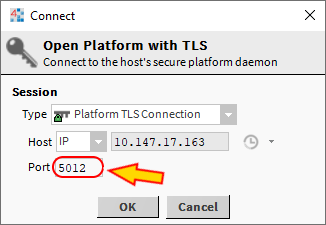
From my Niagara Workbench, I should be able already to connect to the Jace 1 platform, using the Zerotier IP assigned to the Teltonika and the default platform port as for this Jace we haven't changed it
Let's try to configure now the platform access to Jace 2.
We cannot use the same external port, so we are going to use port 5012
Note when adding the Jace 2 Platform rule the two different ports, and of course IP address 192.168.1.102 for Jace number 2
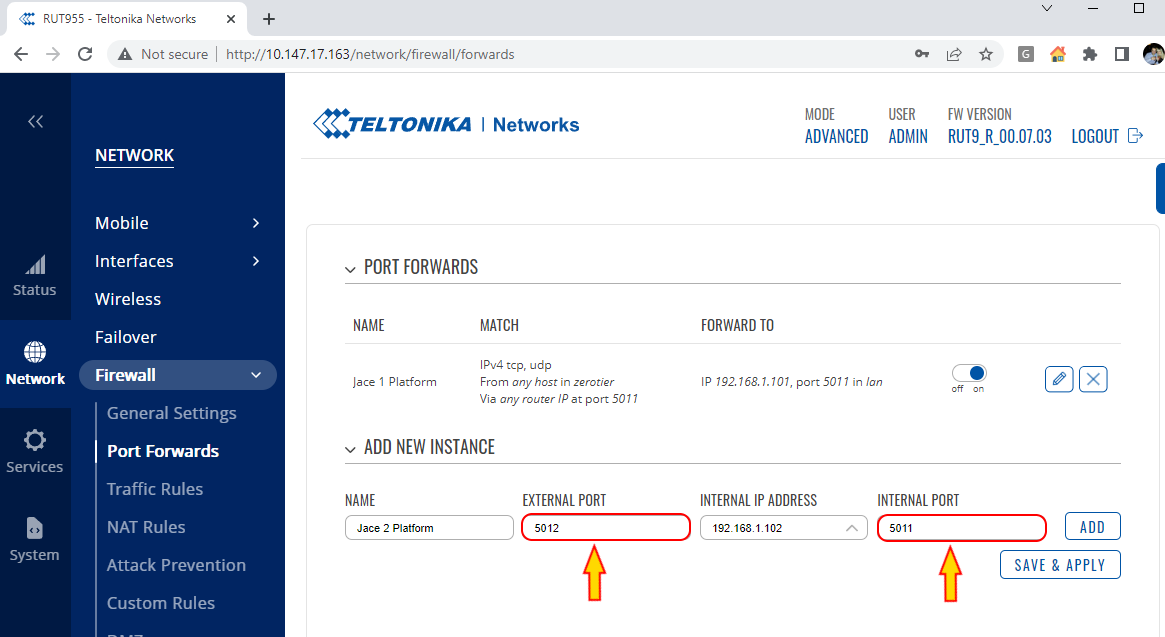
Do not forget to change again the source zone when pressing the ADD button
To connect from your workbench on your PC, you will connect to the same IP address, but just use the assigned different port
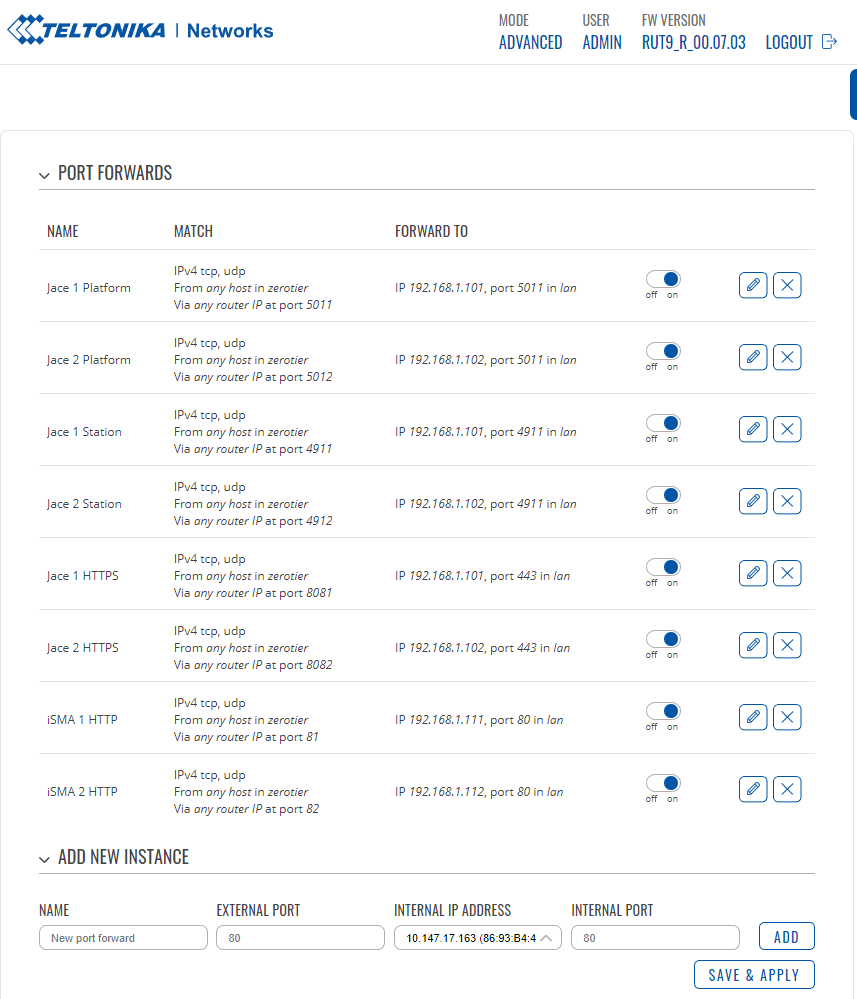
Here is the final complete result for the setup of the firewall port forward rules, based on the desired configuration on this article
Want to get a local device from the LAN of the Teltonika (ie Jace) to connect to a remote one (ie supervisor)?
The windows client will ensure that the Windows PC will have direct access to the Zerotier network. So in the example of a Niagara Supervisor, all you need to do is to open the Firewall Ports (4911 for FOXS) on the inbound rules as usual.
But how about devices that are getting access from the LAN of the Teltonika, like the Jace from the example?
All you need to do for those devices to be able to "see" the remote one, is to change one setting on the Teltonika.
Go to "Firewall - General Settings", check the "Zones" area and find the one that goes "LAN to ZEROTIER" (in the image below it is the first one).
Enable the switch "MASQUERADING", which will allow the local devices to see IP addresses that are not within the LAN range and you are done

Zoomed in:

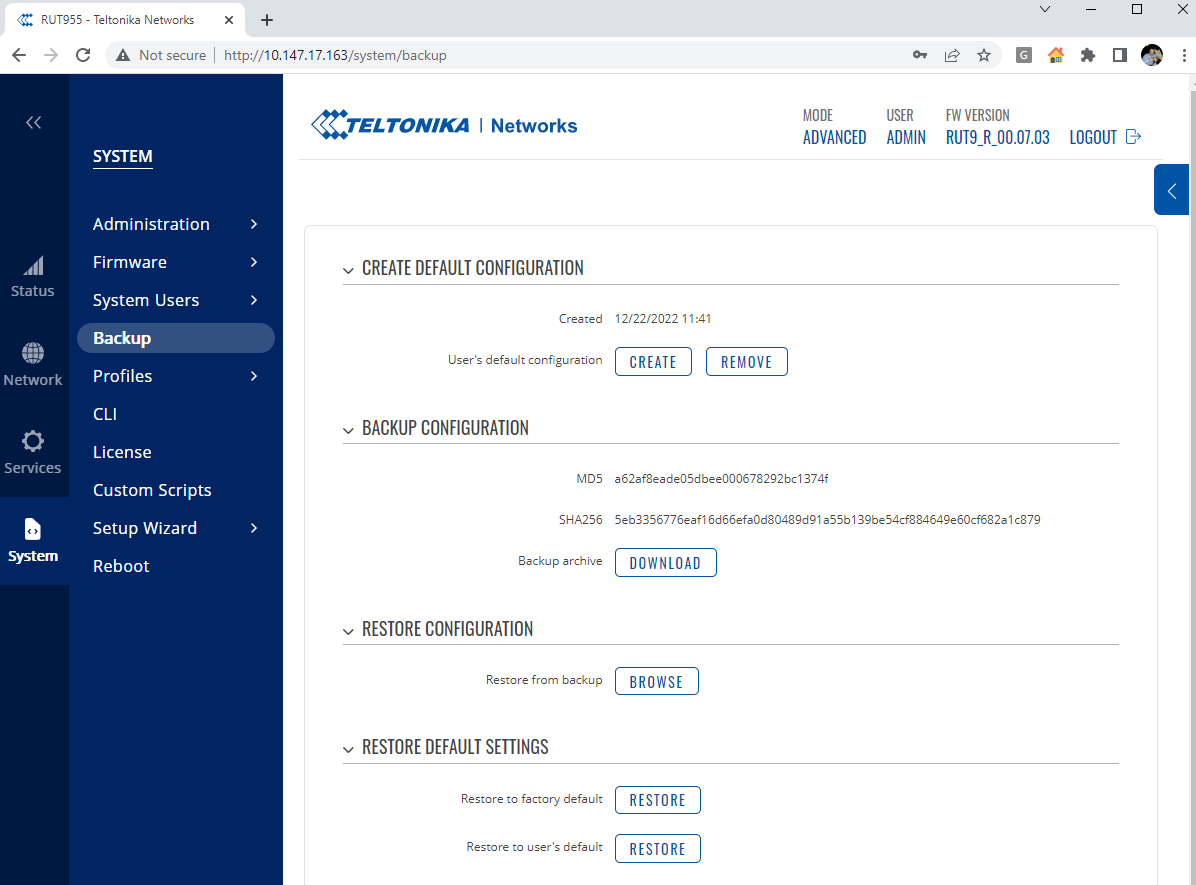
Want to backup your configuration and use it on other routers?
Go to "System - Backup".
In there you can
- Create a Default Configuration which you can later restore within the same router from "Restore Default Settings - Restore to user's default"
- Download your current configuration from "Backup Configuration", so on a separate router you can re-apply the same settings by selecting there the option "Restore Configuration" and select the previously downloaded configuration file