Connecting and configuring the device
1) Power supply
You can use 24Vdc or 24Vac.
Required power for each Jace is 24VAC/24W (1 amp).
A dedicated UL listed, Class 2, 24Vac transformer/24Vdc power supply is required for the Jaces
(cannot power additional equipment).
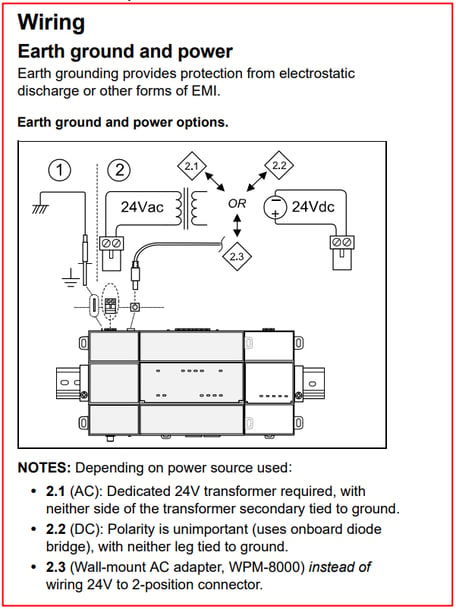
An optional barrel connector plug is available (9.5mm L x 5.5mm OD x 2.1mm ID)
More information on this and how to mount the Jace can be found on the dedicated install instructions on our support website HERE
2) IP port
The IP port uses a standard RJ45 connection.
Note: the Jace is NOT compatible with PoE (Power Over Ethernet), so connecting a powered ethernet cable to a Jace port would cause the unit to fail (lockup). Power cycling the Jace with the PoE disconnected should restore it.
By default, the Jace is shipped with only Ethernet port 1 enabled with IP address 192.168.1.140 and subnet mask 255.255.255.0
3) RS485
Both the RS485 ports on board of the Jace (COM1 and COM2) are optoisolated.
Use shielded, twisted-pair, 18-22 AWG cabling. Connect shield wire to earth ground at one end only.
Remember that if you are connecting with devices that are NOT optoisolated you will need to use a different cable and wiring method! Check HERE the article on how to wire devices that are not optoisolated (e.g. iSMA).
Also check how biasing and termination is achieved on the Jace and other controllers HERE
4) Connect using Niagara to a new Jace
A comprehensive "startup guide" is available within your Niagara installation folder.
The guide by default is installed under:
C:\Niagara\Niagara-4.<your_niagara_version>\docs\docJace8000Startup
Chapter 2, "Preparation".
Set your PC IP address to anything between 192.168.1.1 and 192.168.1.254 (except any already used address, like the default one of the Jace).
Select File > Open > Open Platform and use the TLS (secure) connection.
Use the default 192.168.1.140 Jace IP to connect
The platform default username is tridium, password niagara
On first connection you will be required to set a platform user and password.
5) Commission the Jace
Refer back to the "startup guide" mentioned on point 4)
Chapter 4, "Run the Commissioning Wizard".
Right click on the connected platform and start the Commissioning Wizard process.
Remember a few things here:
- the Jace will get the core distribution file installed of the version of Niagara used for commissioning. This can be modified later if required
- the licenses of the Jace can be installed automatically from the licensing server if the PC commissioning is connected to the internet. If internet is not available, license files can be downloaded separately and installed during commissioning (your supplier should have sent you the files already via email when you ordered the Jace)
- the Niagara modules installed on commissioning will also be the ones of the Niagara version used while commissioning. These can be modified later if required
Remember also that the Jace license comes with an "up to" specific version of Niagara 4. An ongoing valid SMA (Service Maintenance Agreement) on the Tridium License unlocks it with the possibility to upgrade to any newer versions of Niagara.
6) Restore a Jace to factory default
Refer back to the "startup guide" mentioned on point 4)
Chapter 6, "Reference information".
To restore the Jace to factory default you can just use the buttons in front of the controller, under the "flip" panel:
- Power OFF the Jace completely
- Press and hold the "backup and restore" button
- Power up the Jace (hold the "backup and restore" button pressed)
- When the "Backup" LED starts flashing 100ms ON/100ms OFF, release the "backup and restore" button
- The system will begin a 10 seconds countdown automatically. Don't press anything in the meantime and allow the system to do its things
- The Backup LED will start flashing slow (recovery mode). Don't switch off the unit or it will become unusable! The Jace is now restoring to factory default
- The backup LED will stop flashing when the process is finished. You can now remove power and power it back up. The Jace should be restored to factory settings
niagarad: policy file verification failed. Policy files may have been tampered with. Cause is: [/opt/niagara/security/policy/java.security failed signing verification]niagarad: throwable occurred while initializing daemon (java.lang.SecurityException), can not continue
sysmon: niagarad is no longer running
If this happens to you, connect via USB with a PC and shell (see part below) and follow the steps to set a date earlier than 2020 (check manual for the available options), then reboot.
Connect to the platform and use the Distribution File Installer to clean dist the Jace, so a newer factory image is installed. Then, commission the Jace as usual.
7) Connecting a PC over USB (shell)
Refer back to the "startup guide" mentioned on point 4)
Chapter 6, "Reference information".
The USB micro port in front of the Jace is used to access it using the System Shell.
The cable required is a USB micro to USB A.
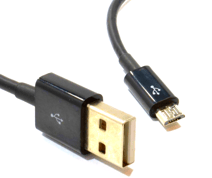
The software required on your PC is a terminal emulation program, like PuTTY (available HERE)
Connection settings are:
- Connection type: Serial
- Speed (baud): 115200
- Data bits: 8
- Stop bits: 1
- Parity: None
- Flow control: None
Use platform credential to login.
Type L to logout.
Type Reboot to reboot the Jace.
See the "startup guide" for more examples.
8) Using a USB drive to backup/restore
A comprehensive "Jace Backup guide" is available within your Niagara installation folder.
The guide by default is installed under:
C:\Niagara\Niagara-4.<your_niagara_version>\docs\docJace8000Backup
You need a USB drive formatted as FAT32 or FAT32X with capacity ≤ 128GB.
You also need to make sure backups are enabled under Platform Administration > Advanced Options > USB Backup Enabled
To create a USB backup
Note: a USB drive can contain more than 1 backup. Each new file name is created using the HostID of the Jace + date and time.
- Confirm power on the Jace is ON
- Insert USB drive. The "backup and restore" LED turns ON
- Hold the "backup and restore" button until the LED flashed at medium speed (100ms ON and 100ms OFF), then release the button
- The LED flashes slowly (1 second ON and 1 second OFF) while the backup is running. Note: if an error occurs during backup, the LED will flash rapidly (200ms ON and 200ms OFF). In this case remove the USB drive and wait for the LED to turn OFF before repeating the procedure again
- When the "backup and restore" LED turns OFF, the backup has terminated. Remove the USB drive
To restore from a USB backup
Note: you can restore also a different Jace, provided it is the same model of the one used during backup.
- Ensure the Jace controller power is OFF
- Prepare a PC with a terminal emulation program (PuTTY) connected to the USB micro of the Jace. Set up the connection (see point above)
- Connect the USB drive containing the backup to the Jace
- Press and hold the "backup and restore" button
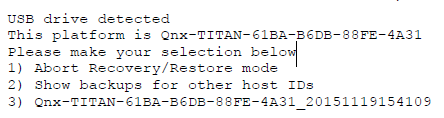
-
Power up the Jace (hold the "backup and restore" button pressed). The following should be shown on the terminal:

- Release the "backup and restore" button (the "Backup" LED is flashing 100ms ON/100ms OFF)
- The system will begin a 10 seconds countdown automatically
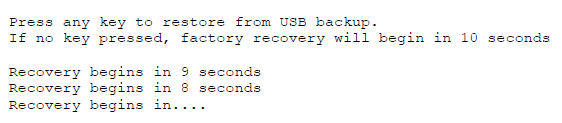
- Press any key during the countdown (otherwise the Jace will begin the Factory Default restoring process after the countdown)
- The system prompts you to input the Passphrase. If the wrong Passphrase is provided, after 2 attempts the system will require you to reboot
- The system mounts the USB drive (note, it might take a few minutes). Do not press any key now, or the process will quit and the Jace rebooted.
- Once the USB is correctly mounted, you can select the number corresponding to the Backup you want to restore
- Follow the instructions on the Passphrase (is the backup Passphrase the same of the one previously provided used by this Jace?)
- The restore should start. Do not remove the USB drive or disconnect power until the process has terminated, or you could damage the controller permanently
- The"backup and restore" LED turns OFF once the restore is completed. You can now power cycle the Jace
Additional information
This guide applies to the following products
JCX8100P
JCX8005
JCX8010
JCX8025
JCX8100
JCX8200
J8DEMO
Where to find the documentation about this product
Data sheets, manuals, installation manuals, device pictures, CAD drawings and certificates can be found on our support website support.innon.com:
HERE is the direct link to the Jace8000
What is inside the box
Inside the box you will find:
- The Jace8000 device
- Connectors (5.08mm MSTB screw down terminal blocks, wi-fi antenna, ground earth patch lead). The barrel power connector is not provided
- The installation instructions