Note: this guide has been replaced by an updated one HERE!
Check it out to know how to use the new firmware also with examples on the configuration of the firewall.
Zerotier is a service that allows to securely connect clients between each other (Teltonika routers, Windows and Mobile clients).
It is easy and fast. In this guide I am going to explain how to configure Zerotier, the Teltonika router and the Windows client to get a network up and running.
A quick note about Zerotier
Zerotier is a service that allows to create networks between devices connected to the internet.
It uses a central server (in the cloud) to configure these networks with an intuitive portal, and each client can connect to one or more of these networks very easily.
Clients include our Teltonika routers, Windows PCs and Mobile devices (Android/iOS).
Clients will be able to connect to Zerotier with pretty much any internet connection, static/dynamic IPs, NAT or behind a firewall. The only port used on the client to connect with the Zerotier server is port 9993 UDP outbound, so it is very unlikely you will have problems with your internet connection.
You won't need to be an IT engineer to configure Zerotier. This guide should have everything you need to get you up and running.
If you want to know more about Zerotier and to download the Windows client later, check up their website here: https://www.zerotier.com/
Network topology
In this article I am going to narrow down the configuration to obtain 2 types of network topologies which I believe are going to be useful in real case scenarios within our industry.
Type 1: SD-WAN network (useful to connect multiple sites between each other)
This is the equivalent of a local network between clients. The Zerotier cloud server allows you to setup networks to which the clients connect to. Each client connecting to a network will be assigned with an IP address and all clients will be able to "see each other" on that network.
This type of network is useful when you want to get sites to communicate between each other, such as Jaces communicating data between sites and reporting to remote supervisors for example.
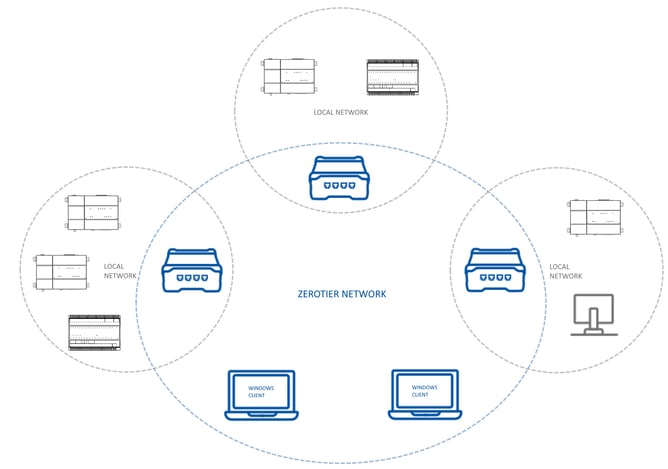
Your "sites" are going to connect using the Teltonika router as Zerotier client. Accessing the local site network (Jaces, MACs and local supervisor in GREY above) will require to setup the firewall of the Teltonika router creating "port forwarding" rules between the Zerotier SD-WAN network and the local network.
We will see how along this article.
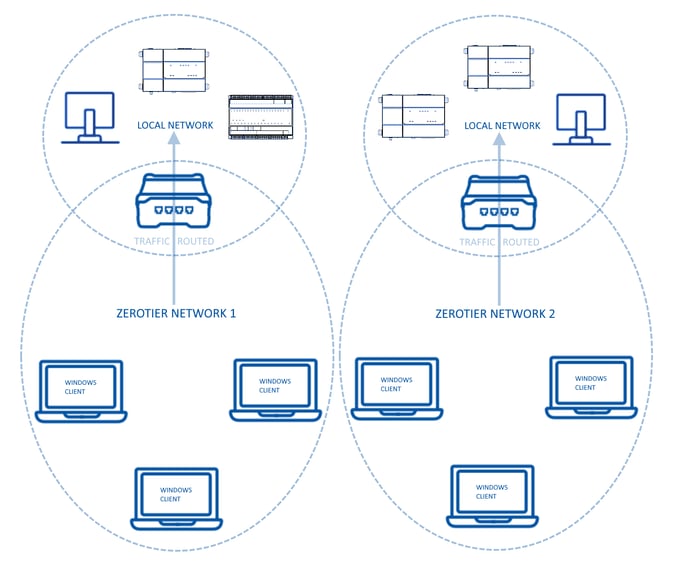
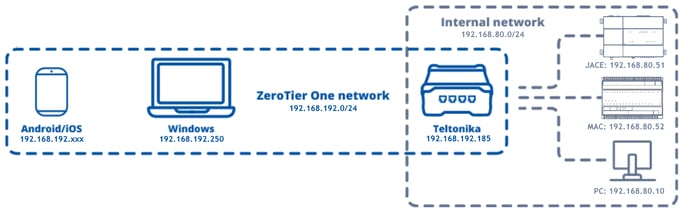
Type 2: SD-WAN with a client routing all communication to its local network (useful for maintenance of individual sites)
The network above requires setting up all the port forwarding rules to access local network devices. This is fine when multiple "local networks" need to be interconnected, but what if I was just looking for an easy way to connect with my engineering PCs to individual sites for maintenance, each on a separate Zerotier network? This connection that we call here "type 2" might help with that.
There is a way to "route" all the traffic of a specific client to its local network. This setup would allow to configure a Teltonika client as an "access point" to its local network, where all other clients connecting to the same Zerotier network can all connect and access the local network devices directly using the local IPs and without the need of setting up port forwarding rules.
The graphic here below might explain better this scenario
See the last chapter of this article to know how to get Zerotier to work in this "Type 2" configuration mode enabling the "routing" function.
Let's start: configure a network in Zerotier
First, create an account with Zerotier if you do not have one already.
From the "Networks" section, you can press "Create A Network".
Click on your network ID just created to access the settings
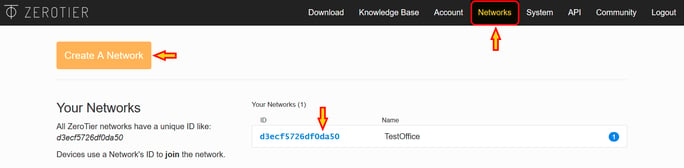
The "Network ID" is going to be the access code you will use on every client to connect to this network.
Once inside the network settings, proceed to configure the "Name" for this network and make sure it is set to "Private"
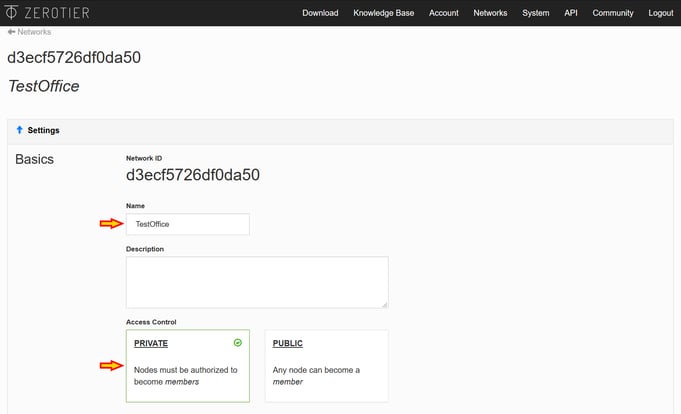
The difference between "Private" and "Public" is that with a "Public" network, any client can connect to the network just using the Network ID, with granted access to the network by default. When set as "Private", the network will accept clients connected only once the user flags them as "Authorized" on their first connection attempt. We will see this later.
Scroll down on the network settings and select the "IP range" you want to use for your SD-WAN network. Each client will get an IP address within that range

Note: the "Managed Routes" will be automatically configured according the the IPv4 Auto-Assign selected. Do not worry about the "Add Routes" part for now. It is going to be used only if you go for a "Type 2" network topology and it is explained towards the end of this article.
A small side note on IP addresses
Remember that your clients will have multiple networks to access and each network should use a different IP range. If your local networks on the Teltonika routers are using "192.168.80.*" (like on our Innon examples), the Zerotier network should use a different range, and your engineering laptop (which is most likely connecting to the internet over WiFi or LAN) should have the local WiFI or LAN network IP range different again, to avoid clashes.
Configure the Teltonika Zerotier client
The first thing we need to do is to install the Zerotier client on our Teltonika router.
Login to your router using the browser (default access credentials are user "admin" password "admin01").
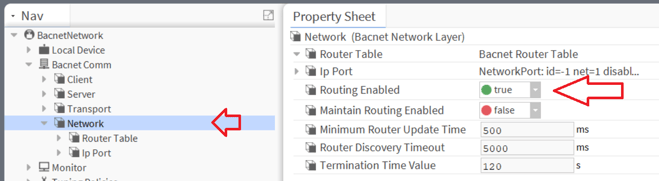
Old firmware versions had some problems when installing and configuring Zerotier, so it is recommended to install the newest firmware. Using an old firmware might get the error here below when installing the Zerotier client:
The firmware can be easily upgraded from the page under "System - Firmware", selecting "Upgrade from server" on the drop down menu and pressing the button "Upgrade" as shown below
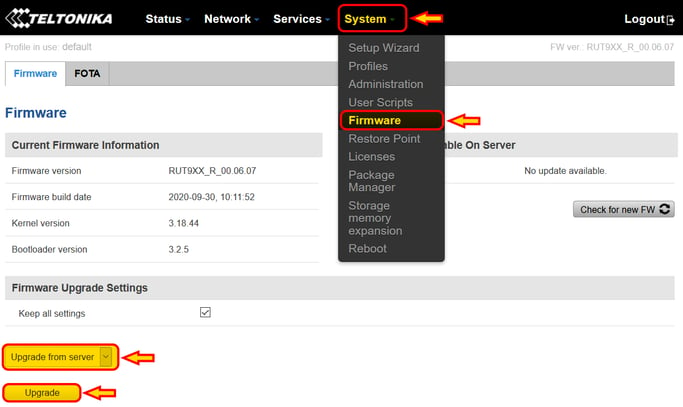
The firmware version used in this guide is 00.06.07, so any version from this forward should be good.
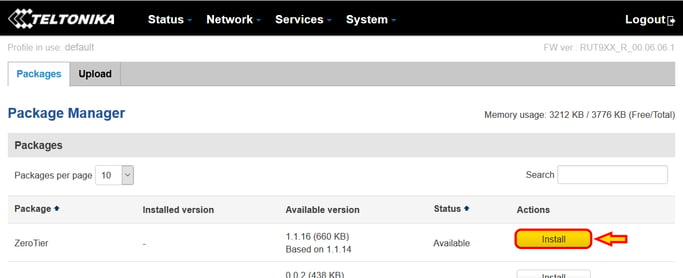
To install now the Zerotier client, go to "System - Package Manager"

Within the Package Manager page, you will be able to install the Zerotier client pressing the "Install" button
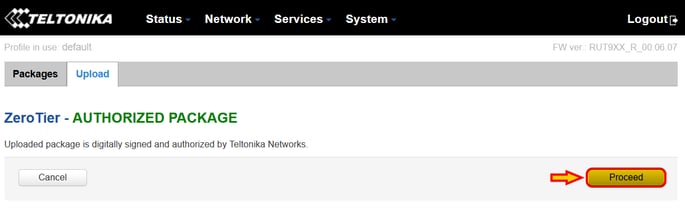
Confirm the installation clicking the button "Proceed" and allow the system the time to run through the entire process
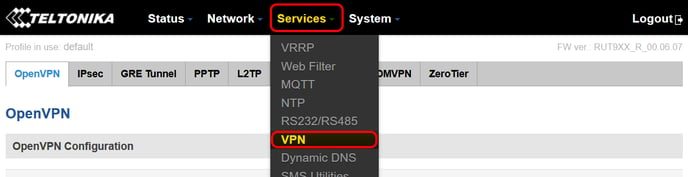
Once the client is installed, we can configure it on "Services - VPN"
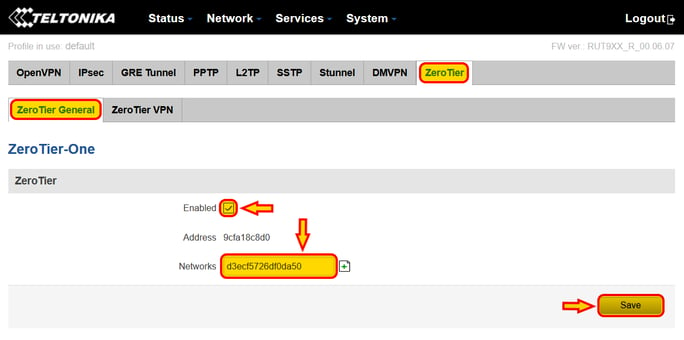
Within the "Zerotier" tab, under "Zerotier General", add the Network ID for your Zerotier network, check the "Enable" flag and press "Save"
Configure the Windows PC client
Download and install the Windows PC client https://www.zerotier.com/download/
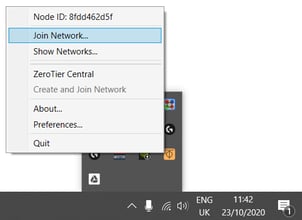
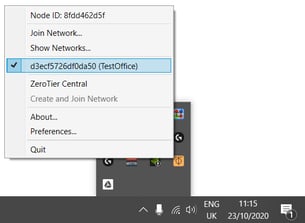
Once installed and running, the client will be visible as an icon on the System Tray, next to the time and date on the bottom right corner of the screen.
Right click on it to open the options menu and select "Join network" to add the previously created Zerotier network
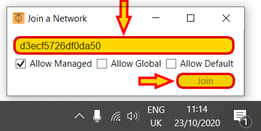
Input the Zerotier Network ID and click the button "Join"
We will need to accept the connection on the Zerotier server later. Before we do that, notice how you can connect/disconnect from the Zerotier network easily, by right clicking on the Zerotier icon and check/uncheck the desired network as shown below
Authorizing the clients on the Zerotier server
Connect again to the Zerotier portal and enter the network settings.
Scrolling down, you will find the "Members" section.
Because the network has been configured as "Private", we need now to "Authorize" each client that is trying to establish a connection with our network.
This is achieved by simply checking the box "Authorize" next to the client. A client trying to establish a connection will create a new instance on this section to authorize.
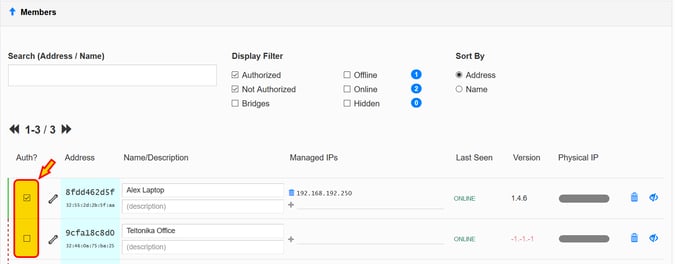
Once authorized, the clients will show the assigned IP addresses and the client software version

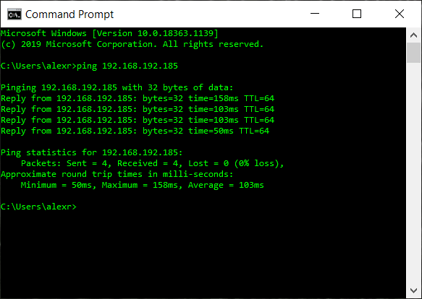
You can now open a terminal window on your Windows PC client and if you try pinging the Teltonika router on its IP address 192.168.192.185 you should have a working communication
Your network is working and you can add many more clients now, like other Teltonika routers and Windows clients.
Type 1 network setup (port forwarding)
Yet, you cannot access the local network devices on the Teltonika router. In my example, I have the Teltonika local network configured in the 192.168.80.* range, with a Jace connected using IP 192.168.80.51 and a MAC using IP 192.168.80.52.
I will need to setup some rules on the firewall to do port forwarding of port 4911, the port used by the FOXS protocol. If I wanted to also connect to the platform (securely), I will need to add the rule for port 5011
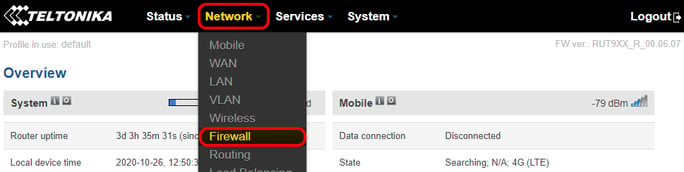
First, I need to get to the settings on "Network - Firewall"
On the second tab called "Port forwarding", I can set up a new rule. For example, if I wanted to access my Jace at IP 192.168.80.51 using the FOXS protocol, I would set up the rule like below
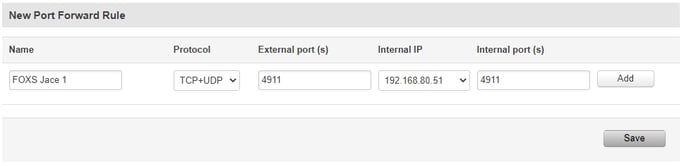
In my case though I want to access 2 devices which use the same 4911 port. So I am going to configure 2 rules and select a different external port on each one of them. The rule for the Jace will use "External port" 4001, the rule for the MAC "External port" 4002, each directing to the correct "Internal IP" and "Internal port" 4911
Here below the rules have been added
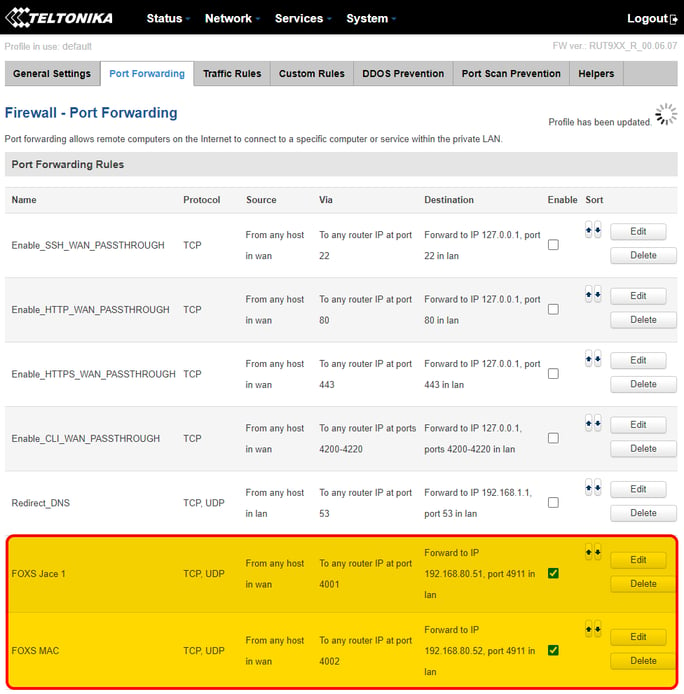
There is a last step to set up the port forwarding correctly. Notice above that the route is "From any source in wan". We need to change that from "WAN" to "Zerotier".
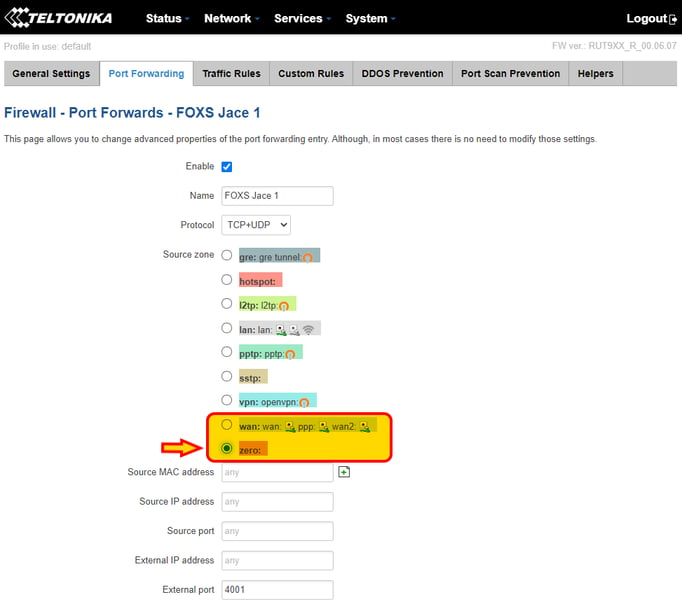
Press "Edit" on the rule
Change now the "Source zone" from the default "wan" to "zero" and press "Save" at the bottom of the page.
Note: it will take a few seconds for the change to be applied, you will see a loading icon on the top right of the page. Leave it there until finished and the page will go back automatically to the Port Forwarding main page
Note: if the steps below are not successful, please go to the "Firewall - General Settings" section and modify the following:
- the "general rule forwarding" set to enable
- masquerading on LAN flagged to enable
- the Zerotier to LAN with forwarding enabled and masquerading flagged to enable
Then test the below again.
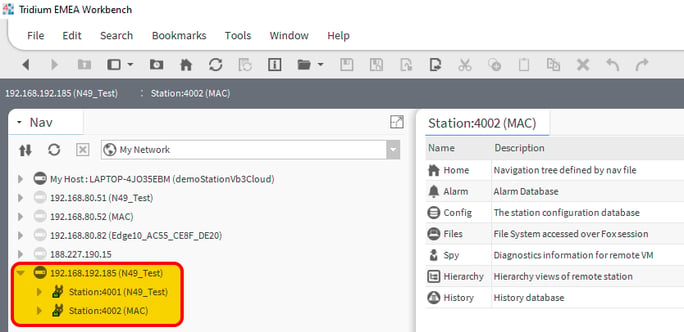
Once both rules have been changed, I can easily connect with my Workbench to both the Jace and MAC. On connecting to the station, I just need to use the Teltonika IP address and port 4001 for the Jace, 4002 for the MAC
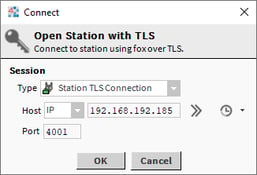
Here are both controllers connected
Type 2 network: configure routing on Zerotier
This type of network doesn't require any port forwarding on the Teltonika.
We are going to use 1 Teltonika router which will be configured in the Zerotier server to direct all the traffic of local IPs to the local network.
The goal is for my clients, like my Windows PC with Zerotier IP 192.168.192.250 to be able to ping and connect directly to any device on the local network of the Teltonika router using directly the local IPs on the 192.168.80.* range
Achieving this is really easy. Login to the Zerotier portal and enter the network settings.
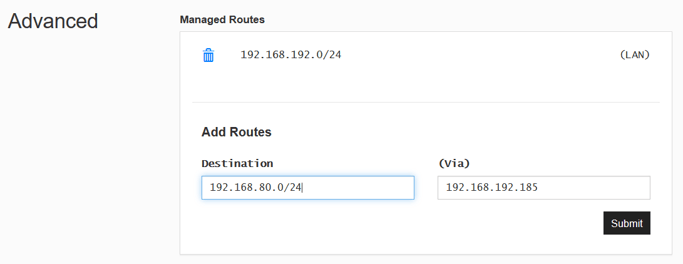
Scrolling down on the "Advanced" settings, I can see the "Managed routes", where there is a default route configured for the Zerotier general network.
I need to add a new rule, where any traffic request on the local network IP range 192.168.80.* is routed via the Teltonika Zerotier IP 192.168.192.250.
Here is how the rule should be configured in my case:
After pressing "Submit", the rule should be seen as follow:
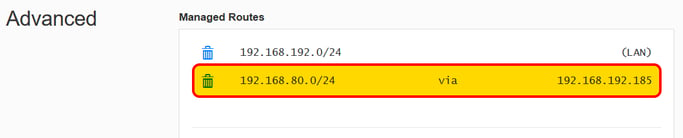
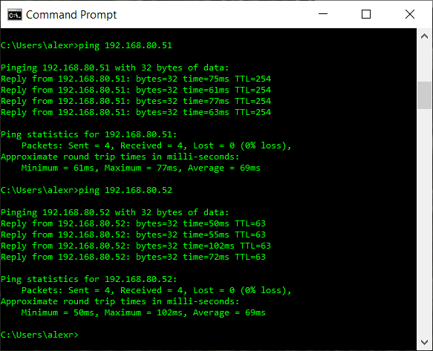
That's all done. I can open a terminal window on my PC and ping the local IP addresses like if I was on the same network
Note: if the steps above are not successful, please go to the "Firewall - General Settings" section and modify the following:
- the "general rule forwarding" set to enable
- masquerading on LAN flagged to enable
- the Zerotier to LAN with forwarding enabled and masquerading flagged to enable
Then test the below again.