Introduction
This article assumes you are familiar with the basics of how MQTT works and its system architecture. If not, please have a look at our other article What is MQTT and where do I start to use it with Niagara? that will give you a good understanding of the basic principles and an overview of some of the options you have in Niagara N4 for preparing, publishing and subscribing to data.
MQTT Broker Options
HiveMQ Public Broker
For this quick start, we intend to keep things really simple by using the HiveMQ public broker - please be very careful - it's easy to access and experiment with but your data will not be secure, therefore, we recommend this for testing purposes ONLY - your or your customer's real data could be stolen or corrupted!
An overview and details of how to connect to the public broker can be found here - HiveMQ Public Broker
On the right hand side of the page, you will see details of the host address URL (broker.hivemq.com) and TCP port (1883) you will need to put into the properties of your MQTT device in your Niagara driver later in the exercise - no credentials or certificates are required - that's all you need, the broker is up and running waiting for you to connect over the internet and publish/subscribe to any topics you create in your station MQTT driver.
You don't need to set-up the topics in the broker first - they are created when the client (in our case the Niagara N4 station) first publishes the topic to the broker
Other Broker Options
There is a more secure and private HiveMQ Cloud Cluster Broker you can setup - please see here HiveMQ Cloud Broker
This will create a dedicated URL just for your purposes, use a different, more secure port (8883, secure MQTT) and ask you to set-up users - all these parameters need to be added to the N4 MQTT driver devices as required if this is the broker you choose but it is fairly intuitive to set up at broker and N4 station end.
You can also install a free broker called Mosquitto on your laptop or another local device - this may suit you better if you only need local BEMS MQTT integration for any reason and would rather the data didn't go off-site into the cloud - please see here - Mosquitto Download
There are other brokers and ways of hosting them, but the principles are mostly the same.
Set-up Your Niagara N4 Station to Publish
- Create a station in a JACE or a PC platform
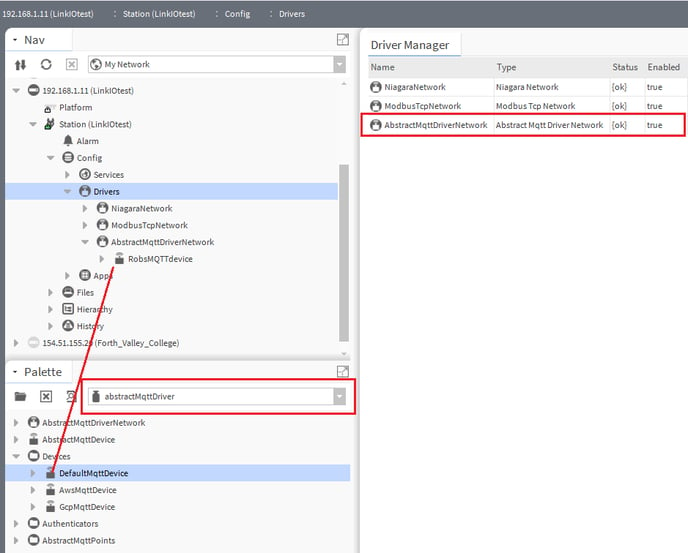
- Add an Abstract MQTT Driver Network under Config\Drivers (in Driver Manager view, click new or drag from abstractMqttDriver palette onto Drivers in nav. tree view)
- Add an MQTT device - open the abstractMqttDriver palette and under "Devices" drag a DefaultMqttDevice onto the AbstractMqttDriverNetwork you created in step 2 and name it something meaningful to you - you should have something looking like this -
- Setup the device to connect to the broker - open the property sheet of the new MQTT device and unfold the authenticator container - we're going to connect to the public HiveMQ over the internet and need to enter the details we saw in the relevant section above, i.e. -
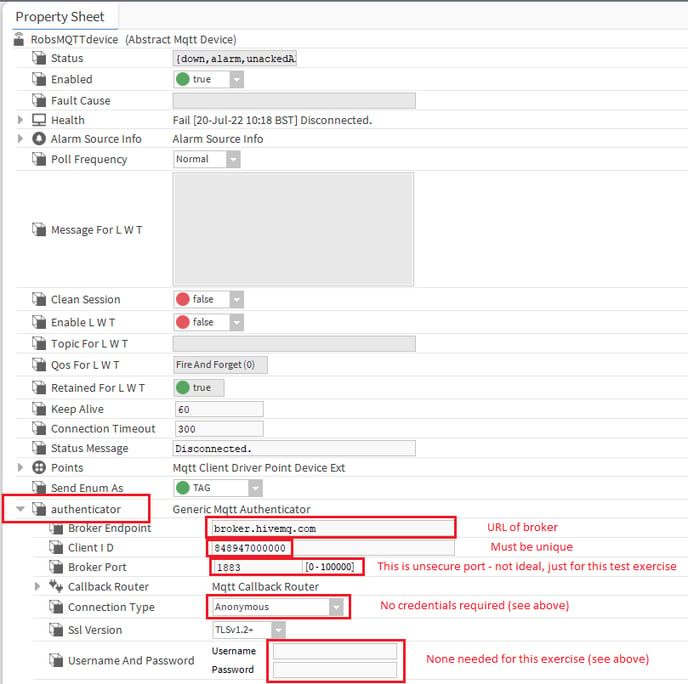
- Just briefly - if you wanted to use the more secure and private HiveMQ Cloud broker you would set the Broker Endpoint to your unique cluster URL shown in "Cluster Details" page, Broker Port to 8883 (MQTT secure), Connection Type to "User login over SSL" and then enter the credentials you setup as part of the HiveMQ Cloud cluster configuration (you can add multiple users too) into Username And Password - some cloud service providers have very specific ways of authenticating and Tridium have provided dedicated Niagara MQTT devices and authenticators in the abstractMqttDriver palette to cater for them - please see this AWS and this GCP (Azure - coming soon in N4.12!)
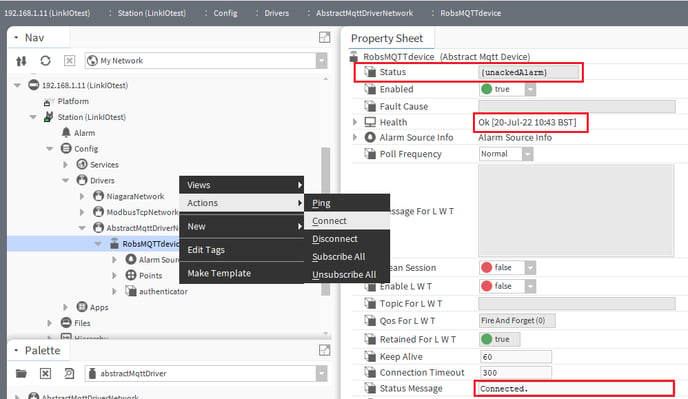
- Now to connect to the broker - right click on your new device and under "Actions" select Connect you should see the status and health fields change and look like this -
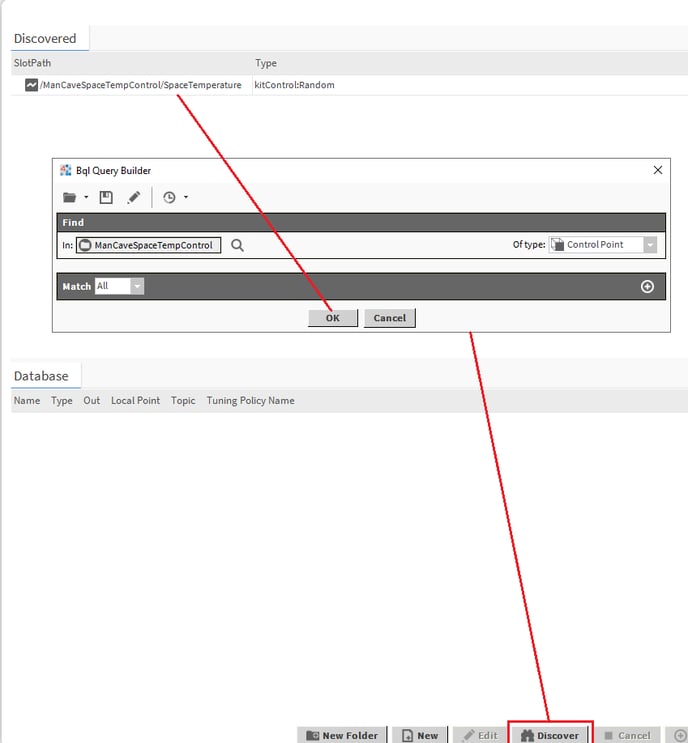
- Now to publish some of your stations data to the cloud! Under your MQTT device is a "Points" container - here you can manually add publish and subscribe points then link them to other points in your station OR discover existing points in your station to publish - double click on the Points container and you will see the Mqtt Client Driver Points Manager view -
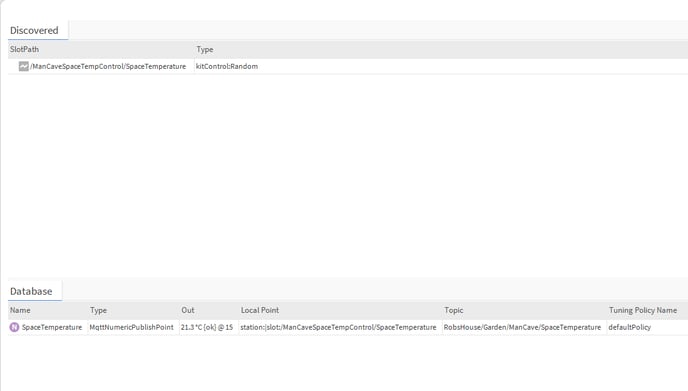
- Click "Discover" and you will see the familiar BQL Query Builder that you can use to search for all points in the station by just clicking OK, OR click the magnifying glass and select certain areas of the station to search and/or set "Of type" and "Match" fields to limit the search to certain types of points and/or point slot values - choose the options that best suit what you are looking for (I'm looking in a certain folder where I have a simulated temperature sensor) and click OK
- You will see the available points in the "Discover pane", i.e. -
- Double click the point you want to add to the database (to publish as an MQTT topic to the broker) and type in the topic you want it to publish to - it is entirely up to you how you structure the topics, but for my example, I am going to use several topic levels to give you an idea of how they can be used in a logical way to group data, i.e. my topic for my office temperature will be RobsHouse/Garden/ManCave/SpaceTemperature
- Here's what it should look like -
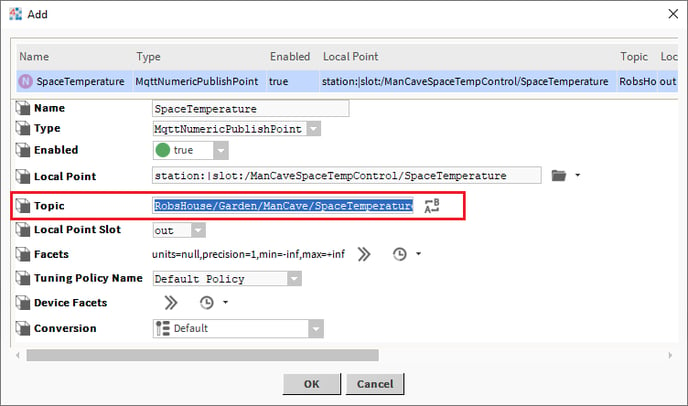
- Notice that the correct "Type" is selected, i.e. MqttNumericPublishPoint
- Click OK and you should see the point in the database -
- Now to subscribe to the data published by my JACE from a second station - any MQTT client in the world could subscribe to my office space temperature topic (provided they know the HiveMQ connections details and the topic; again, notice that it's not very secure to use a public broker in this way, even though it is very easy!) and receive updates when the temperature changes - for our exercise, I'm going to use a second N4 station (running on my laptop) to subscribe to it -
- Set-up the second station in exactly the same way as the first one (in my case, my JACE) described in points 1 to 6 above - of course, the "Client ID" in the authenticator needs to be unique within the broker, i.e. different from your first N4 station (and all the other thousands of clients using the public broker; another reason to use something more private for real applications!)
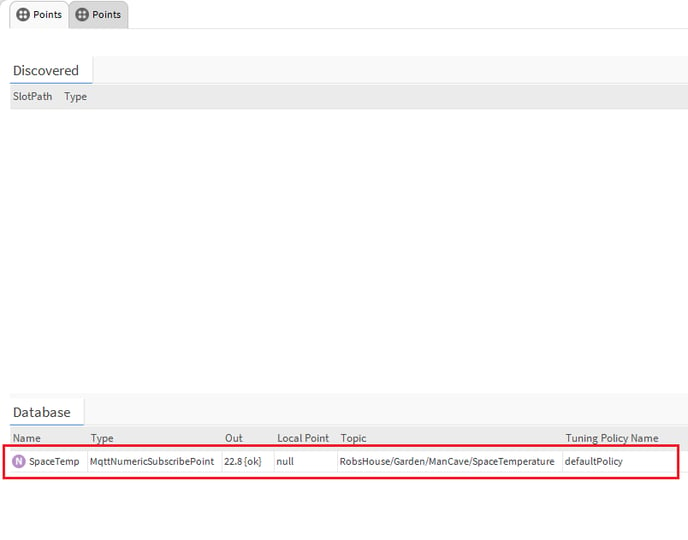
- Double click the Points container under your MQTT device and click "New" button at the bottom - set as follows -
- "Type to add" as "MqttNumericSubscribePoint"
- Click OK
- Type a suitable name in
- Set Topic to the same you set in the first station publish point, in my case, I want to subscribe to the temperature in my office so I set it to - RobsHouse/Garden/ManCave/SpaceTemperature
- Click OK
- The point will be added to your database and will initially be stale - right click on your MQTT device and select "Actions" then "Subscribe All" and you should see the point get (or subscribe to) the data being published to the topic by your first station in the Database pane - you can now link mark this to other areas of your station and/or add alarm and history extensions to it like any other proxy point
You've now managed to get data from one place to another, over the internet, without needing to set up any VPNs or firewall rules. This is because, with the broker sitting in the middle, all connections are initiated from each site to the broker on an outgoing internet connection which is generally allowed or allowable, in most cases
We used a very simple single "point-to-point" data transfer of just the temperature value, no label and no units - in some cases, this may be all you need. However, if you wanted to exchange data that involved large amounts of points and/or wanted to include the point labels, units, parent container name etc. this can be more efficiently transferred by packing them up into a JSON payload (using the JSON Toolkit) publishing as a single topic then decoding the topic payload at the subscriber end (again using JSON Toolkit) and mapping to the relevant points and slots
The topic fields are case sensitive and publish and subscribe topic fields must match exactly if they are to publish and subscribe to the same topic - also, DO NOT use any spaces in your topics!