Connecting and configuring the device
1) Power supply
You can use 20Vac to 28Vac or 20Vdc to 28Vdc
The power required depends on whether you are powering in AC (24VA) or DC (14W).
A dedicated UL listed, Class 2, 24Vac transformer/24Vdc power supply with 1 amp capacity for each MAC36NL is recommended.
Compared to other iSMA devices, the MAC36NL CANNOT be powered from the USB mini port situated behind the front panel. This port can only be used for "console" connection (see point 10))
Check our article about best practice and recommendations on powering our iSMA devices HERE
IMPORTANT! When powering up a MAC36NL for the first time, a binding procedure starts between the MAC36NL and the SD card installed on it (takes at least a couple of minutes). Removing power supply early and disrupting this binding process might cause the MAC36NL to not start the platform properly anymore (most cases this will be shown by the RUN led staying fixed ON).
If you accidentally happen to get into this situation, it is possible to re-flash the SD card to its factory state by using a micro SD card reader and the software and SD image available at THIS link
2) IP port
The IP port uses a standard RJ45 connection.
By default, the MAC36NL is shipped with only Ethernet port 1 enabled with IP address 192.168.1.123 and subnet mask 255.255.255.0
3) RS485
The RS485 port on board of the MAC36NL (COM1, and COM2 if you have the dual port version) are optoisolated, like on a Jace.
Use shielded, twisted-pair, 18-22 AWG cabling. Connect shield wire to earth ground at one end only.
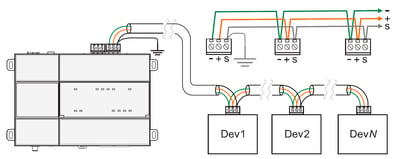
Remember that if you are connecting with other devices that are NOT optoisolated you will need to use a different cable and wiring method! Check HERE the article on how to wire devices that are not optoisolated (e.g. many other iSMA devices).
Also check how biasing and termination is achieved on the MAC36NL and other controllers HERE
4) Prepare your Niagara Workbench to work with the iSMA MAC36NL
This Niagara 4 controller is not manufactured by Tridium and it needs its specific DIST files installed on the Workbench to be commissioned properly.
If you haven't installed them before, make sure you follow THIS GUIDE and install the required files.
Failing to do so will result on not being able to commission the MAC36NL later.
Note: not all version of Niagara 4 are compatible with the MAC36NL. Check if a dist file exists for the version you want to use to verify compatibility at point 6).
5) Connect using Niagara to a new MAC36NL
A comprehensive "manual" is available in our support website HERE.
Chapter 3.4, "First login to the controller platform in Workplace".
Set your PC IP address to anything between 192.168.1.1 and 192.168.1.254 (except any already used address, like the default one of the MAC36NL).
Select File > Open > Open Platform and use the NON-TLS (unsecure) connection. This is required only for the first connection
Use the default 192.168.1.123 MAC36NL IP to connect
The platform default username is tridium, password niagara
On first connection you will be required to set a platform user and password.
6) Commission the MAC36NL
The Niagara versions that this controller is compatible with are:
- Niagara 4.4.73 (not recommended)
- Niagara 4.4.92 (not recommended)
- Niagara 4.6.96.28
- Niagara 4.7.109.20
- Niagara 4.8.0.110
- Niagara 4.9.0.198 (Use the installer v1.4)
- Niagara 4.9.1.30
- Niagara 4.10.0.154 (Use the installer v1.5)
- Niagara 4.10.1.36 (Use the installer v1.7)
- Niagara 4.10.3.20
- Niagara 4.11.1.16
- Niagara 4.12.0.156 (Use the installer v1.8)
- Niagara 4.12.2.16
For all new features and improvements, please see the Release Notes.
First of all, you will need to make sure that you have the distribution files installed in the Workplace. Check how to install the DIST files for the MAC36NL HERE
Right-click on the connected platform and start the Commissioning Wizard process.
Remember a few things here:
- the MAC36NL will get the core distribution file installed of the version of Niagara used for commissioning. This can be modified later if required.
Note: The 4.8 needs a Clean controller before upgrading from older versions. You will need to install the CleanDist file through Distribution File Installer found under the controller's platform.
- the licenses of the MAC36NL can be installed automatically from the licensing server if the PC commissioning is connected to the internet. If internet is not available, license files can be downloaded separately and installed during commissioning (your supplier should have sent you the files already via email when you ordered the MAC36NL)
- the Niagara modules installed on commissioning will also be the ones of the Niagara version used while commissioning. These can be modified later if required
Remember also that the MAC36NL license comes with an "up to" specific version of Niagara 4. An ongoing valid SMA (Service Maintenance Agreement) on the Tridium License unlocks it with the possibility to upgrade to any newer versions of Niagara.
7) Restore a MAC36NL to factory default
Refer back to the "manual" mentioned on point 5) and available HERE
Chapter 3.9, "Restore controller to the factory default".
To restore the MAC36NL to factory default you can just use the dip-switches in front of the controller, under the front panel (remove carefully using a small flat screw driver):
- Power OFF the MAC36NL completely
- Pull up the switch 6 in the S3 dip-switch to the ON position (up)
- Power up the MAC36NL
- The controller "Alarm" LED starts flashing quickly
- Pull the switch 6 in the S3 dip-switch to the OFF position (down) to start the
procedure of restoring the factory values - Once the restoring process is terminated, the system starts the platform without needing to reboot the MAC36NL ("Run" LED fast flashing)
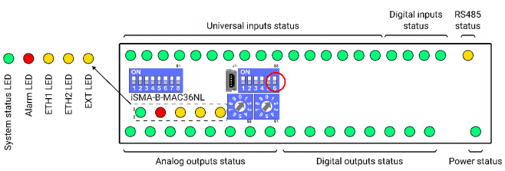
8) Using the Local IO
The MAC36NL controller comes with 36 on-board I/O points available, with a mix of analog and digital Inputs/Outputs.
A comprehensive knowledge base article explains all the details about the Local IO with links to the manual and files, HERE
9) Using the HDMI port to connect a screen
Refer back to the "manual" mentioned on point 5) and available HERE
Chapter 3.11, " HDMI Connection".
The MAC36NL allows to connect a touch screen directly to the controller without using the IP network. This is usually a cheaper and more direct solution to get graphic directly from a controller to a screen, but it should be used only for basic visualizations without too many complications, pages and ramifications, like a device display for example. This is due to the restricted graphic processing power embedded on the controller.
Consider the following highlights:
- A local HDMI display should be used for basic "device" graphical pages
- Connect both the HDMI and the USB cables for the touch screen to work
- Prepare your MAC36NL with the iSMA_HDMI module installed so it will be possible to use it on your station
- Enable the HTTP web port
- Use the "Handheld" profile on the User settings for the local display user
- Pop-up windows are not supported
Refer to the knowledge base article explains all the details about the HDMI with links to the manual and files, HERE
10) Connecting a PC over USB (shell)
Refer back to the "manual" mentioned on point 5) and available HERE
Chapter 3.6, " Connection to the console".
The USB mini port in front of the MAC36NL is used to access it using the System Shell.
The cable required is a USB mini to USB A.
The software required on your PC is a terminal emulation program, like PuTTY (available HERE)
Connection settings are:
- Connection type: Serial
- Speed (baud): 115200
- Data bits: 8
- Stop bits: 1
- Parity: None
- Flow control: None
Use platform credential to login.
Additional information
This guide applies to the following products
iSMA-B-MAC36NL-100
iSMA-B-MAC36NL-150
iSMA-B-MAC36NL-250
iSMA-B-MAC36NL-300
iSMA-B-MAC36NL-500
iSMA-B-MAC36NL-1250
iSMA-B-MAC36NL-RS-100
iSMA-B-MAC36NL-RS-150
iSMA-B-MAC36NL-RS-250
iSMA-B-MAC36NL-RS-300
iSMA-B-MAC36NL-RS-500
iSMA-B-MAC36NL-RS-1250
iSMA-B-MAC36NL-M-100
iSMA-B-MAC36NL-M-150
iSMA-B-MAC36NL-M-250
iSMA-B-MAC36NL-M-300
iSMA-B-MAC36NL-M-500
iSMA-B-MAC36NL-M-1250
Where to find the documentation about this product
Data sheets, manuals, installation manuals, device pictures, CAD drawings and certificates can be found on our support website support.innon.com:
HERE is the direct link to the MAC36NL
What is inside the box
Inside the box you will find:
- The MAC36NL device
- Connectors (5.08mm MSTB screw down terminal blocks)
- 200 ohm resistors set to connect 4-20mA signals to the Universal Inputs
- The installation instructions